Asymmetric Static Routing Network Using Ubuntu Machines
Build an asymmetric static routing network with Ubuntu hosts and Linux routers: enable IP forwarding, relax rp_filter, and add routes and backup routes.

On this page
Updated November 2026: I wrote this post in 2018 for Ubuntu 16.04 and the route command. Current releases such as Ubuntu 24.04 and 26.04 do not install route, so the commands now use ip. The old commands are at the end of the post.
In asymmetric routing, data packets take different paths to go from source to destination and to come back [source]. To set up an asymmetric network on Linux machines running Ubuntu, first, we need to configure the systems to act as routers. Let’s consider a network of 3 hosts and 3 routers as Figure 1 shows. The routers are going to be Linux systems bundled with several NICs.
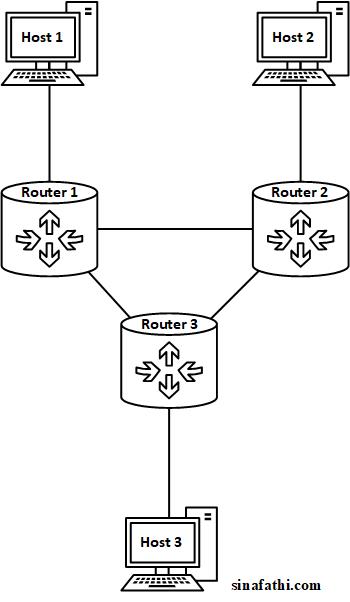
Figure 1. Network layout.
Configuring the Routers
The routers should be able to forward the packets from one network interface card’s (NIC) port to the others. In a terminal window, enter the following command (only on routers):
sudo sysctl net.ipv4.ip_forward=1
We also need to make sure a router does not drop a packet that arrives on a different interface than the one it would use to send the reply. Linux calls this check reverse path filtering. Setting it to 2 (loose mode) allows asymmetric paths. Enter the following commands (only on routers):
sudo sysctl net.ipv4.conf.all.rp_filter=2
sudo sysctl net.ipv4.conf.default.rp_filter=2
NOTE: These settings are lost when the machine restarts. To keep them, put the three name=value lines in a file such as /etc/sysctl.d/99-router.conf and run sudo sysctl --system.
Assigning Subnets and IP Addresses
Now, we are ready to assign addresses to the machines. We consider the following subnets here:
- The subnet for Host 1 connection to Router 1: 10.0.1.0/24
- The subnet for Host 2 connection to Router 2: 10.0.2.0/24
- The subnet for Host 3 connection to Router 3: 10.0.3.0/24
- The subnet for Router 1 connection to Router 2: 10.0.4.0/24
- The subnet for Router 1 connection to Router 3: 10.0.5.0/24
- The subnet for Router 2 connection to Router 3: 10.0.6.0/24
Figure 2 shows the assigned IP address to each port of Linux machines.
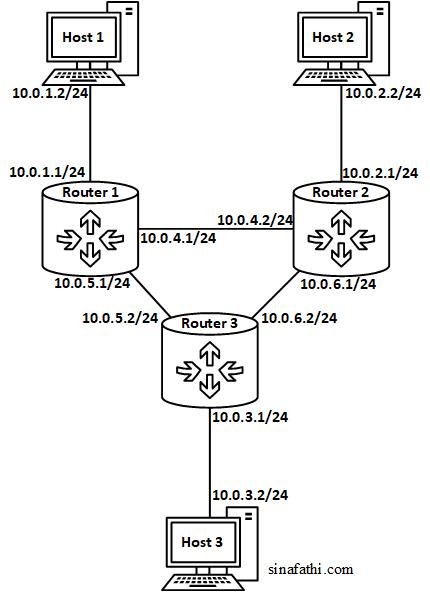
Figure 2. Assigned IP addresses to each port.
To see the names of the network interfaces on a machine, run ip -brief link. Then assign each address from Figure 2 to its interface. For example, on Host 1:
sudo ip addr add 10.0.1.2/24 dev <interface>
sudo ip link set <interface> up
When you assign an address, Linux adds the route to that subnet by itself. So Host 1 can already reach 10.0.1.0/24, and each router can already reach the three subnets it is connected to.
Setting Up Routing Tables
The only remaining step is to tell each machine how to reach the subnets it is not connected to. For those, the gateway is the IP address of the next hop on a subnet the machine shares. For example, Host 1 reaches network 10.0.5.0 through Router 1 at 10.0.1.1:
sudo ip route add 10.0.5.0/24 via 10.0.1.1
We need to add a route like this for every remote subnet on every host and router. Figure 3 shows the required routing tables for each machine. Rows where the gateway is the machine’s own address are the directly connected subnets, which Linux already added.
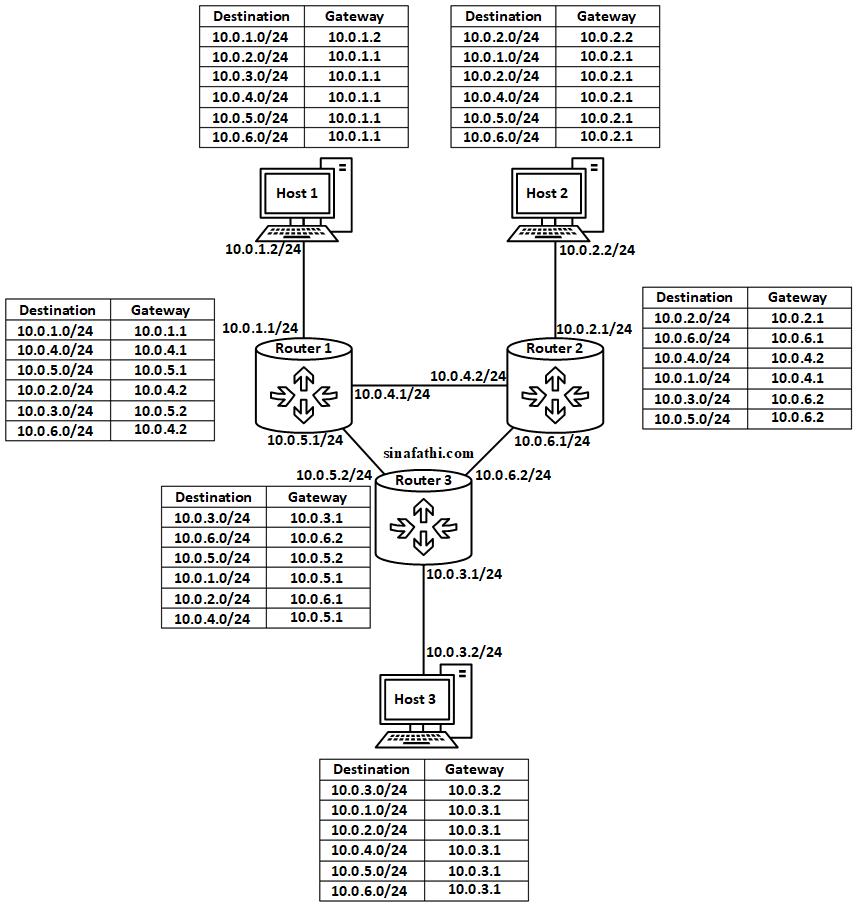
Figure 3. Routing tables for each system.
For example, Router 1 is connected to 10.0.1.0, 10.0.4.0 and 10.0.5.0. It needs three routes for the other subnets:
sudo ip route add 10.0.2.0/24 via 10.0.4.2
sudo ip route add 10.0.3.0/24 via 10.0.5.2
sudo ip route add 10.0.6.0/24 via 10.0.4.2
To check the result on any machine, run ip route.
Adding Backup Routes
Now we can also add alternate routes to the same network with a higher metric (lower priority). For example, we could add the following backup route to Router 2:
sudo ip route add 10.0.3.0/24 via 10.0.4.1 metric 100
We can test this route by running the ping command on a specific interface of Router 2:
ping 10.0.3.2 -I interface_connected_from_Router_2_to_Router_1
NOTE: Routes that you add with ip route are also lost on restart. On Ubuntu, put the addresses and routes in a Netplan file under /etc/netplan/ to make them permanent.
The Old route Commands
On Ubuntu 16.04 I used the route command from the net-tools package. The commands above translate like this:
route add -net 10.0.5.0 netmask 255.255.255.0 gw 10.0.1.1
route add -net 10.0.3.0 netmask 255.255.255.0 gw 10.0.4.1 metric 100
I write about reinforcement learning, transformers, multi-agent systems, and the tools I build along the way.