Sabattier: A Batch Photo Editor with On-Device AI
Sabattier is a batch photo editor for Windows and macOS. It has auto enhance, masks, portrait retouching, background removal and AI upscaling. All of these run on your computer.
On this page
- Install
- Step 1: Add your photos
- Step 2: Use the one-click fixes on the Quick tab
- Step 3: Crop
- Step 4: Remove the background
- Step 5: Make the background darker with a mask
- Step 6: Blur the background
- Step 7: Edit one face
- Step 8: Retouch a portrait quickly
- Step 9: Apply the same edits to all photos
- Step 10: Rate and pick
- Step 11: Save
- The other tools
- Your photos stay on your computer
- Links
After an event, I usually have a folder with some hundred photos. Most of them need the same small changes: more light, warmer color or a straighter crop. Some photos need more work, for example a darker background or a better portrait. I wanted one app that can do the two types of work. The app must run on my computer and must not send my photos to a server.
Sabattier is this app. It is a batch photo editor for Windows and macOS. Import a folder (RAW files are supported). Then edit one photo or all photos at the same time, and export them as high-quality JPEGs. The AI tools run on your computer through ONNX Runtime:
- Background removal
- Healing
- Face masks
- Lens blur
- Upscaling
This post shows a full editing session, step by step, from the import of the photos to the export.
Install
Download the installer for your system from the releases page:
| System | Installer |
|---|---|
| Windows (64-bit) | Sabattier-<version>-windows-x64.setup.exe |
| macOS (Apple Silicon) | Sabattier-<version>-macos-arm64.dmg |
There are two versions of each installer:
- Standard. This installer is small. It downloads each AI model the first time that you use the tool that needs it.
- With-models. This installer is approximately 575 MB larger. It operates fully offline from the start.
The installers do not have a code signature. Thus, your system shows a warning the first time:
- Windows: In the SmartScreen prompt, select More info → Run anyway.
- macOS: If the system blocks the app, open System Settings → Privacy & Security and select Open Anyway.
You can also build the app. Sabattier is a Tauri app, thus you need Rust and the Tauri CLI:
cargo install tauri-cli --version "^2" --locked
cargo tauri dev
Step 1: Add your photos
To add photos, do one of these steps:
- On the start screen, click Choose photos or Choose a folder.
- Drag the files into the window.
After the first import, the same buttons are in the top bar as Add photos and Add folder.
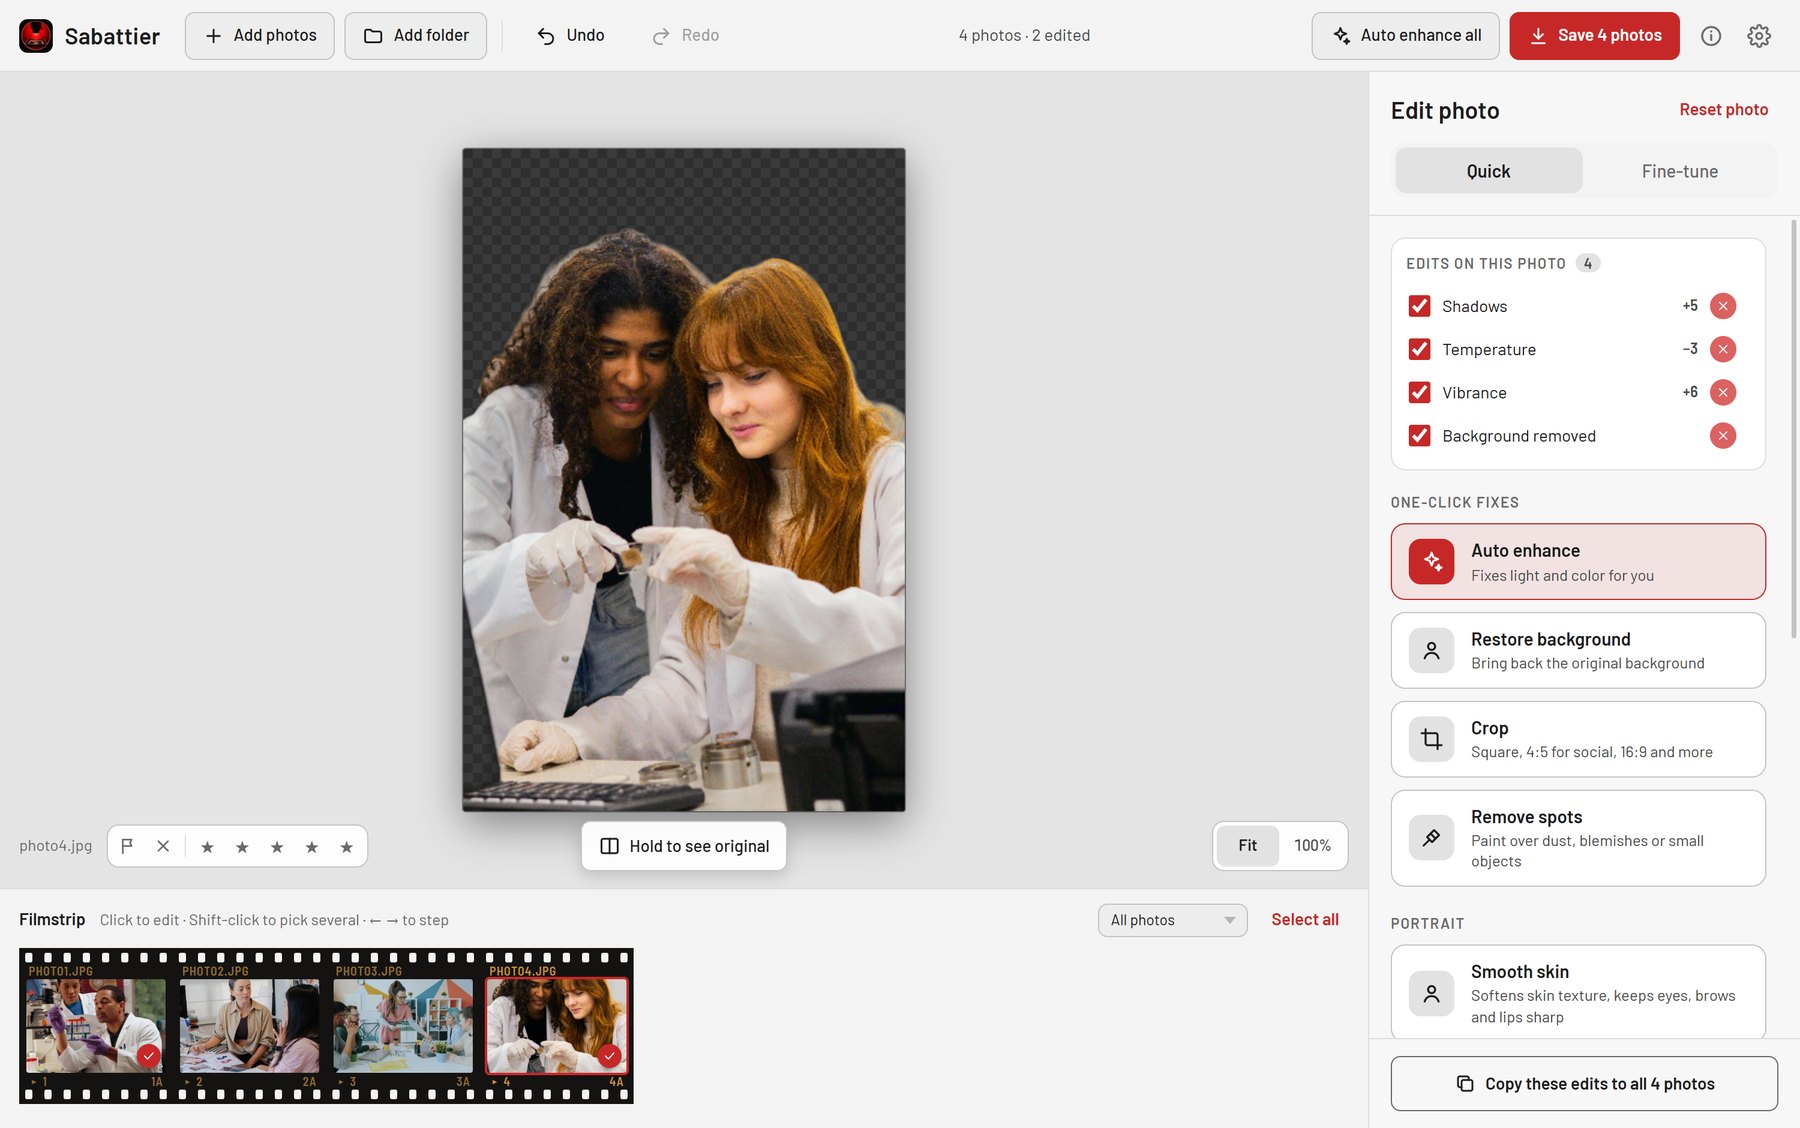
Your photos show in the filmstrip at the bottom of the window:
- Click a photo to edit it.
- Shift-click to select more than one photo.
- Push
←or→to go to the previous or next photo.
The top bar shows the number of photos and the number of edited photos.
Sabattier also opens RAW files from most cameras: CR2, CR3, NEF, ARW, DNG, RAF, ORF, RW2, PEF and SRW.
Step 2: Use the one-click fixes on the Quick tab
The panel on the right has two tabs. Start with the Quick tab. It has the one-click fixes and three simple sliders. For most photos, this tab is sufficient.
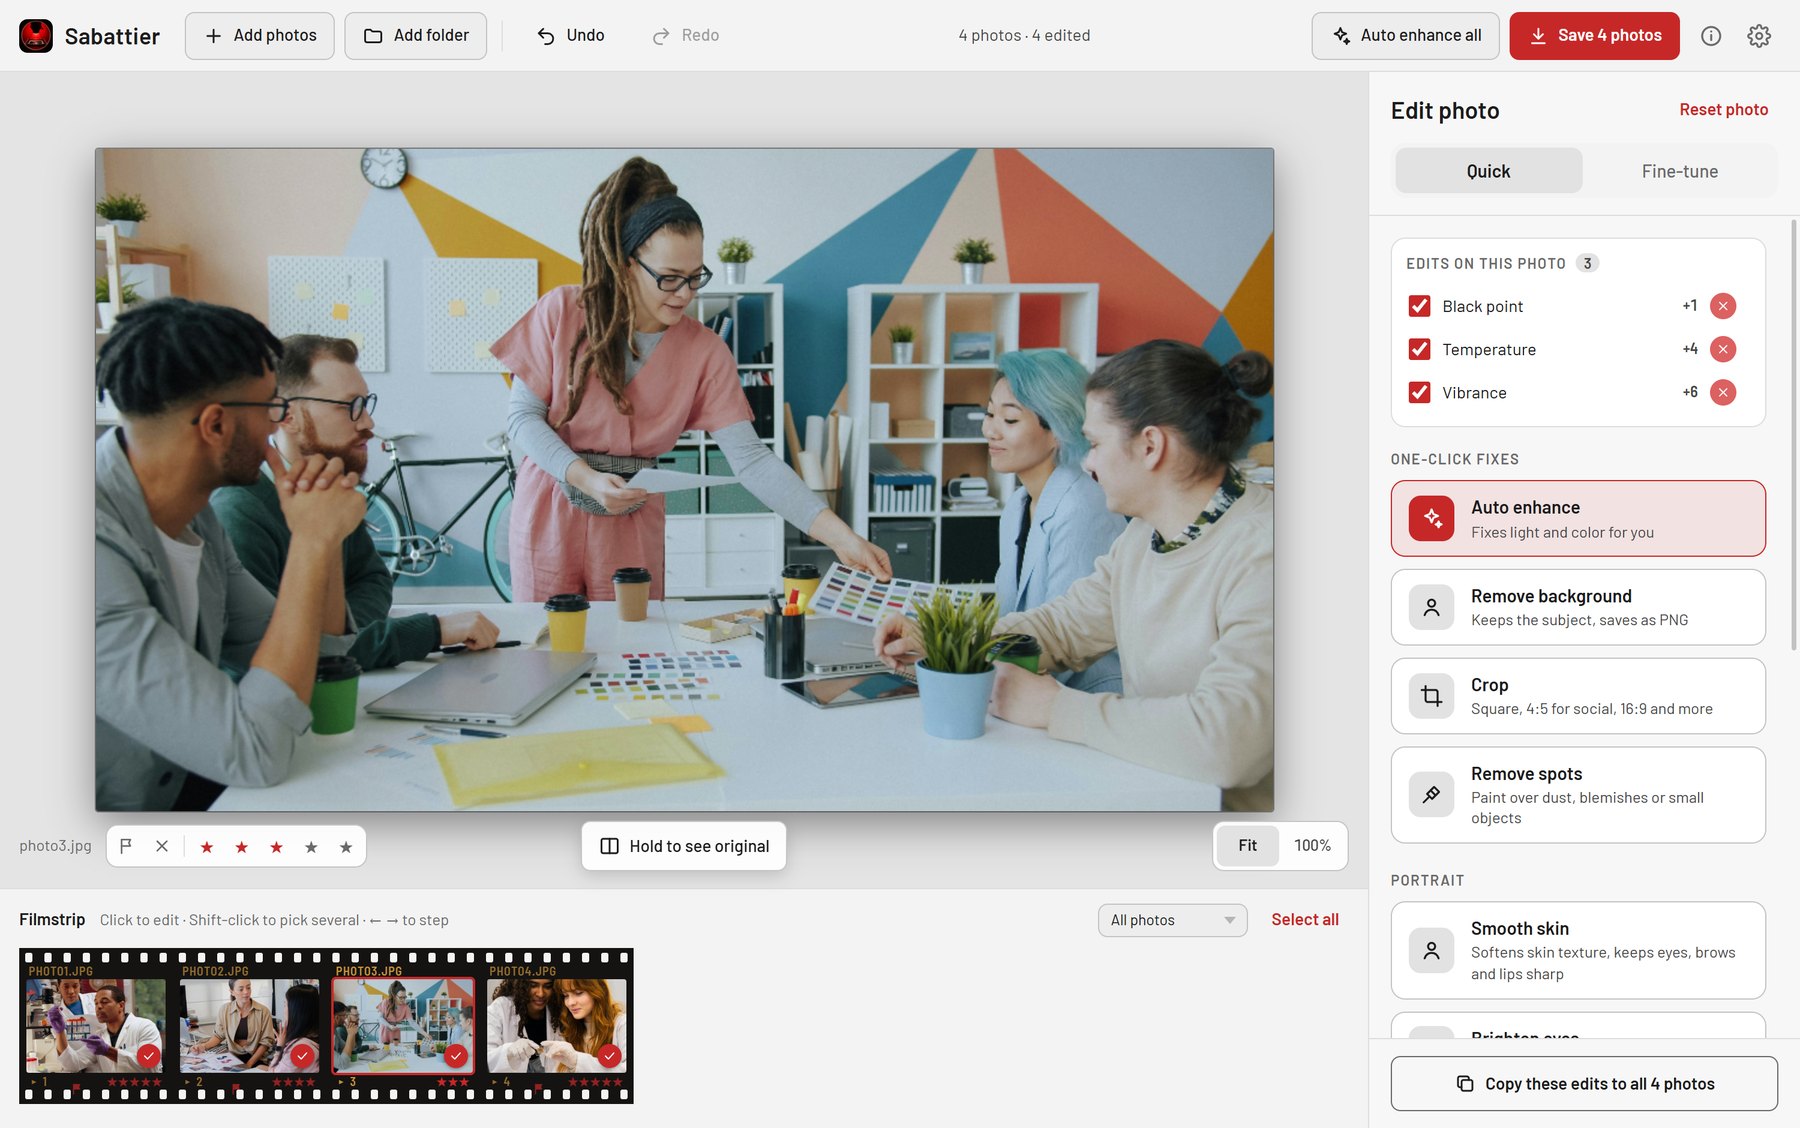
- Click Auto enhance. Sabattier reads the histogram of the photo. It sets the white balance, exposure, black point, highlights, shadows and contrast.
- Look at Edits on this photo at the top of the panel. This list shows each change. Auto enhance uses the usual sliders, thus all changes are visible. In the screenshot above, it increased the black point by 1, the temperature by 4 and the vibrance by 6.
- To disable an edit and keep its value, clear its checkbox. To remove an edit, click the red button.
If the result is not correct, use the Simple adjustments below: Brightness, Warmth and Color intensity. Their names tell what they do. You do not need to know the meaning of “vibrance”.
To compare the photo with the original, push and hold Hold to see original below the photo.
Step 3: Crop
-
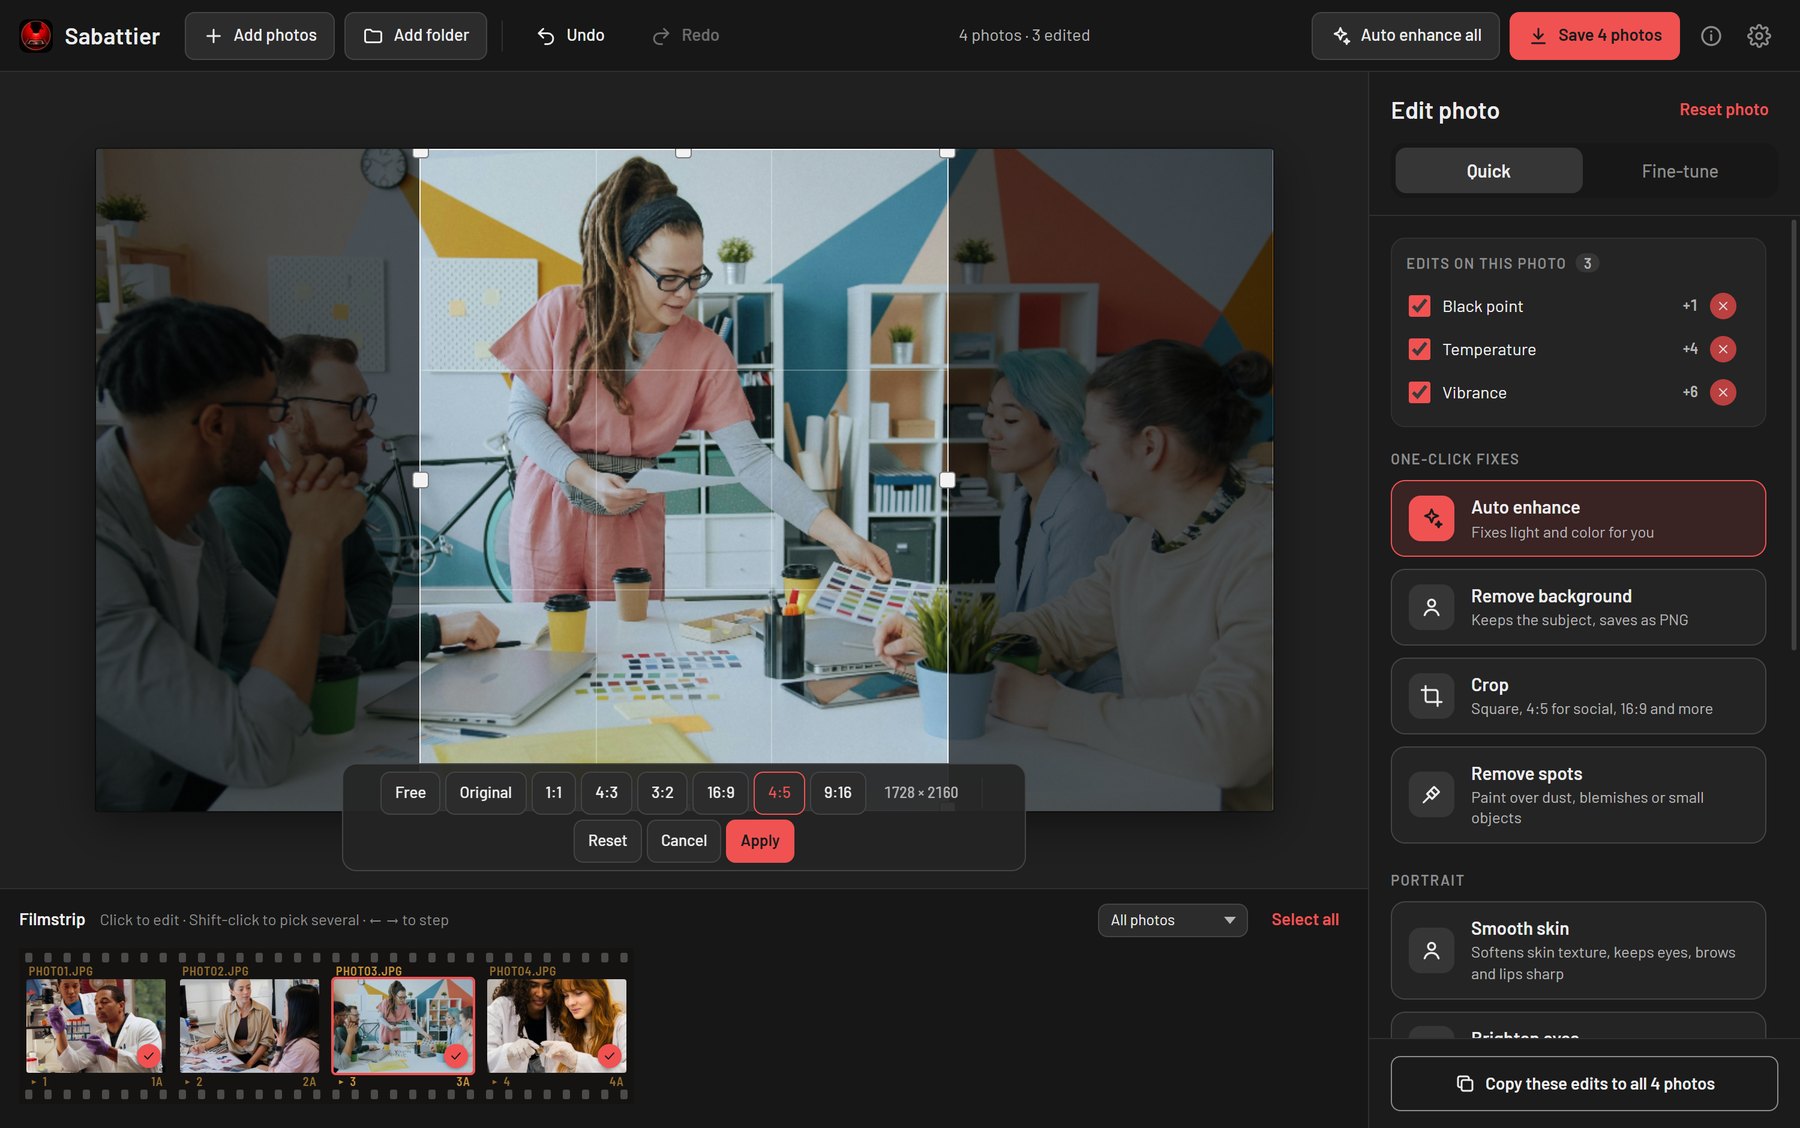
In the one-click fixes, click Crop. A crop box with a rule-of-thirds grid shows on the photo:
-
In the bar below the photo, select a ratio: Free, Original, 1:1, 4:3, 3:2, 16:9, 4:5 or 9:16. The final size in pixels shows next to the ratios.
- Drag the box or its handles to the correct position.
- To keep the crop, push Apply (or
Enter). To stop, push Cancel (Esc).
The crop does not change the original photo. Sabattier keeps the crop as a setting and applies it during the export. Thus, you can change the crop later.
Step 4: Remove the background
Click Remove background. Sabattier removes the background and keeps the subject. The first time, Sabattier downloads the segmentation model (approximately 170 MB). After that, the tool operates offline.
A checkerboard shows the removed background, as in the first screenshot of this post. Sabattier saves these photos as PNG files, thus the transparency stays. This is the saved file next to the original:
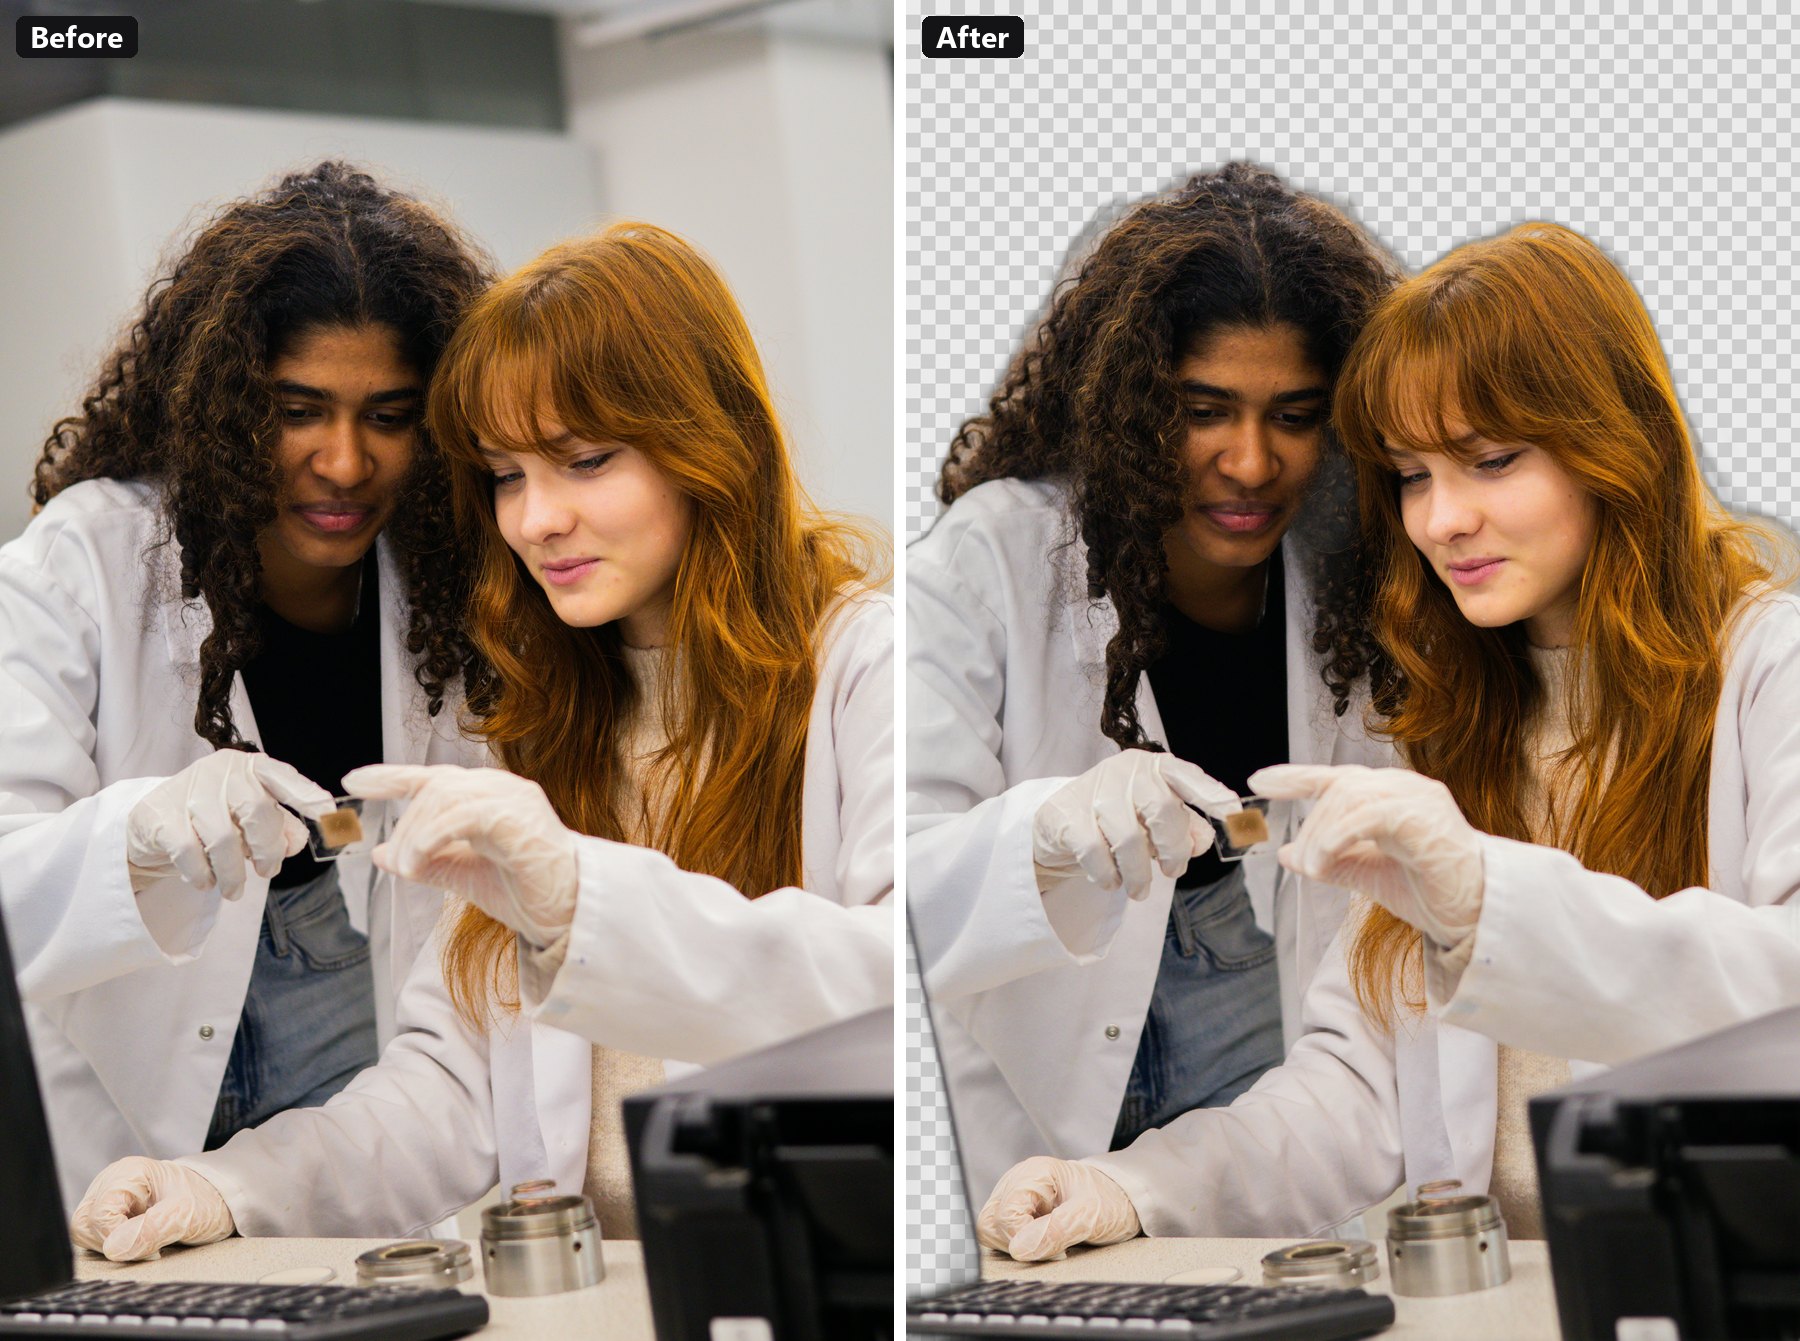
The edges are soft, not sharp. Thus, hair and the edges of the lab coats look natural. To put the background back, click Restore background.
Step 5: Make the background darker with a mask
Sometimes the background must stay, but it must be less visible. Use a mask for this. Go to the Fine-tune tab and open Masks.
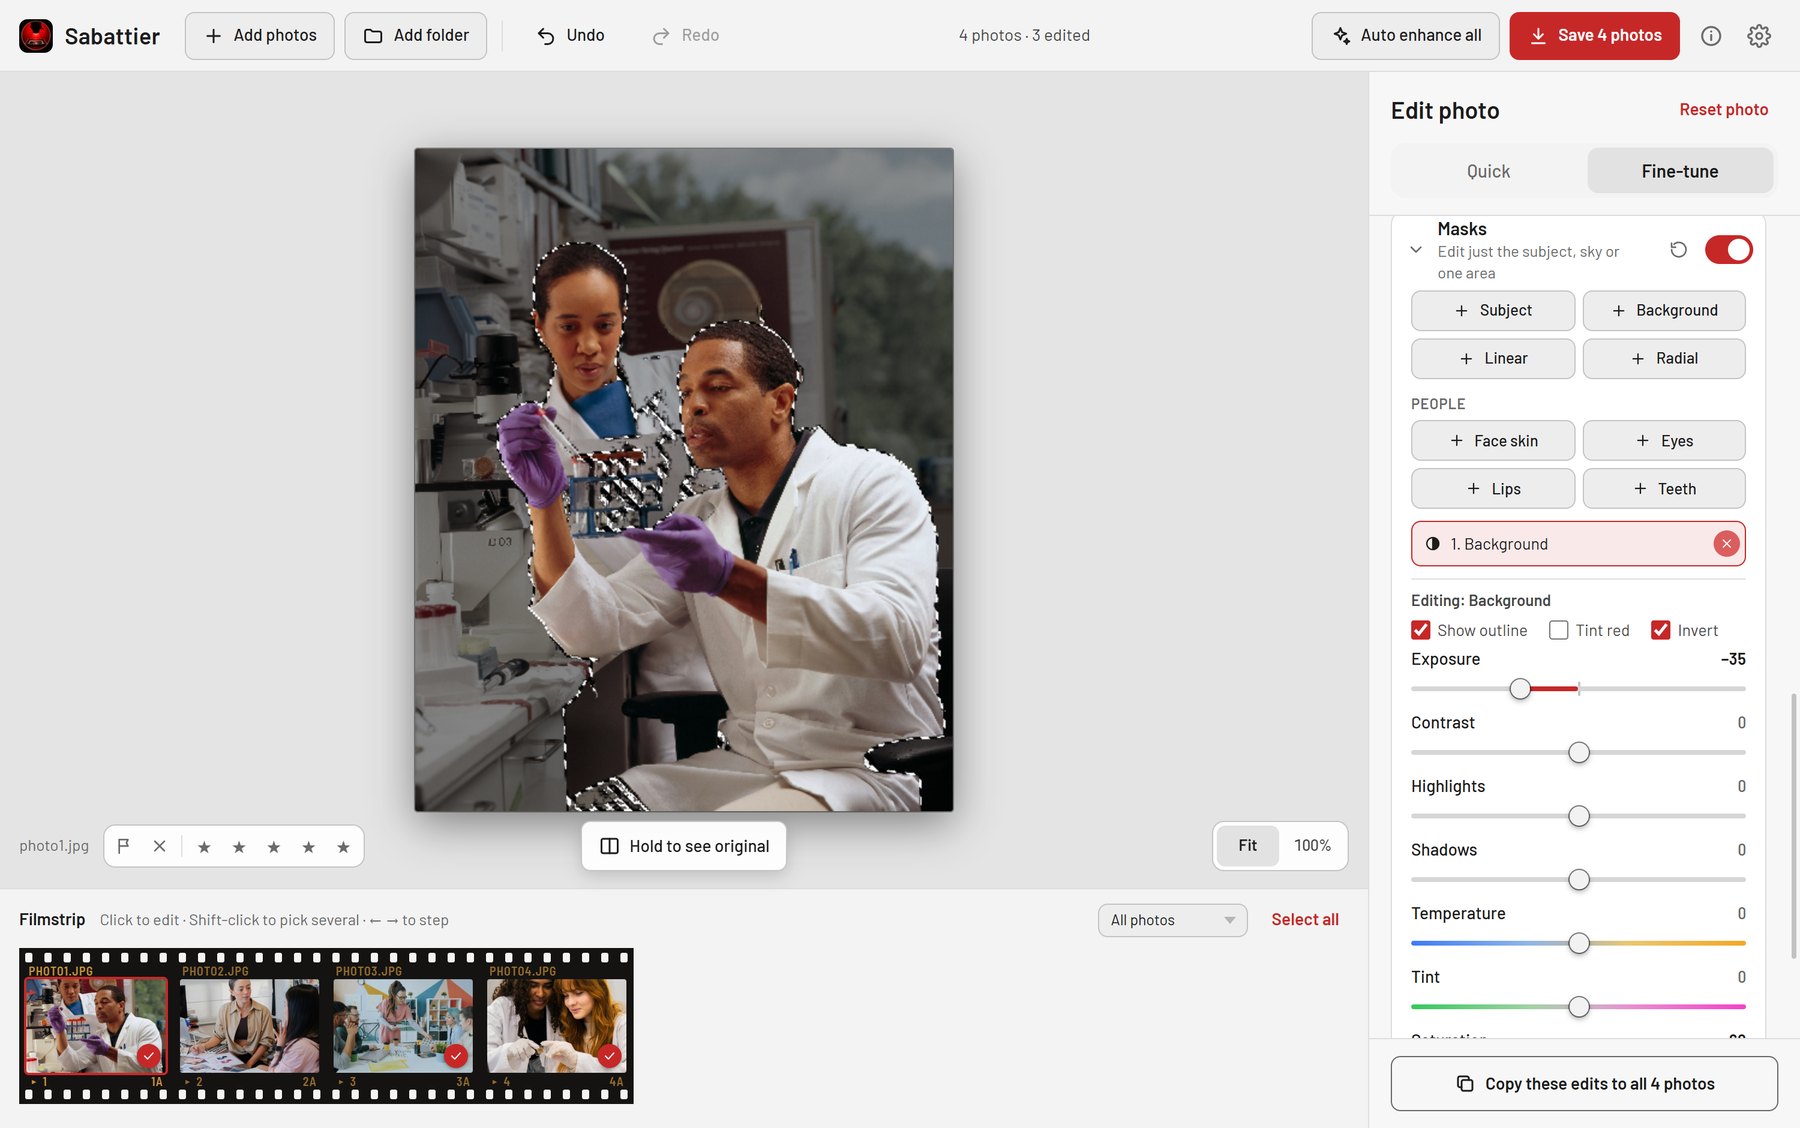
- Click + Background. Sabattier finds the people in the photo and selects all areas around them.
- To see the edge of the mask on the photo, select Show outline.
- Move a slider. The change applies only to the background. In this example, Exposure is -35, and the lab behind the two people becomes dark.
This is the saved photo:
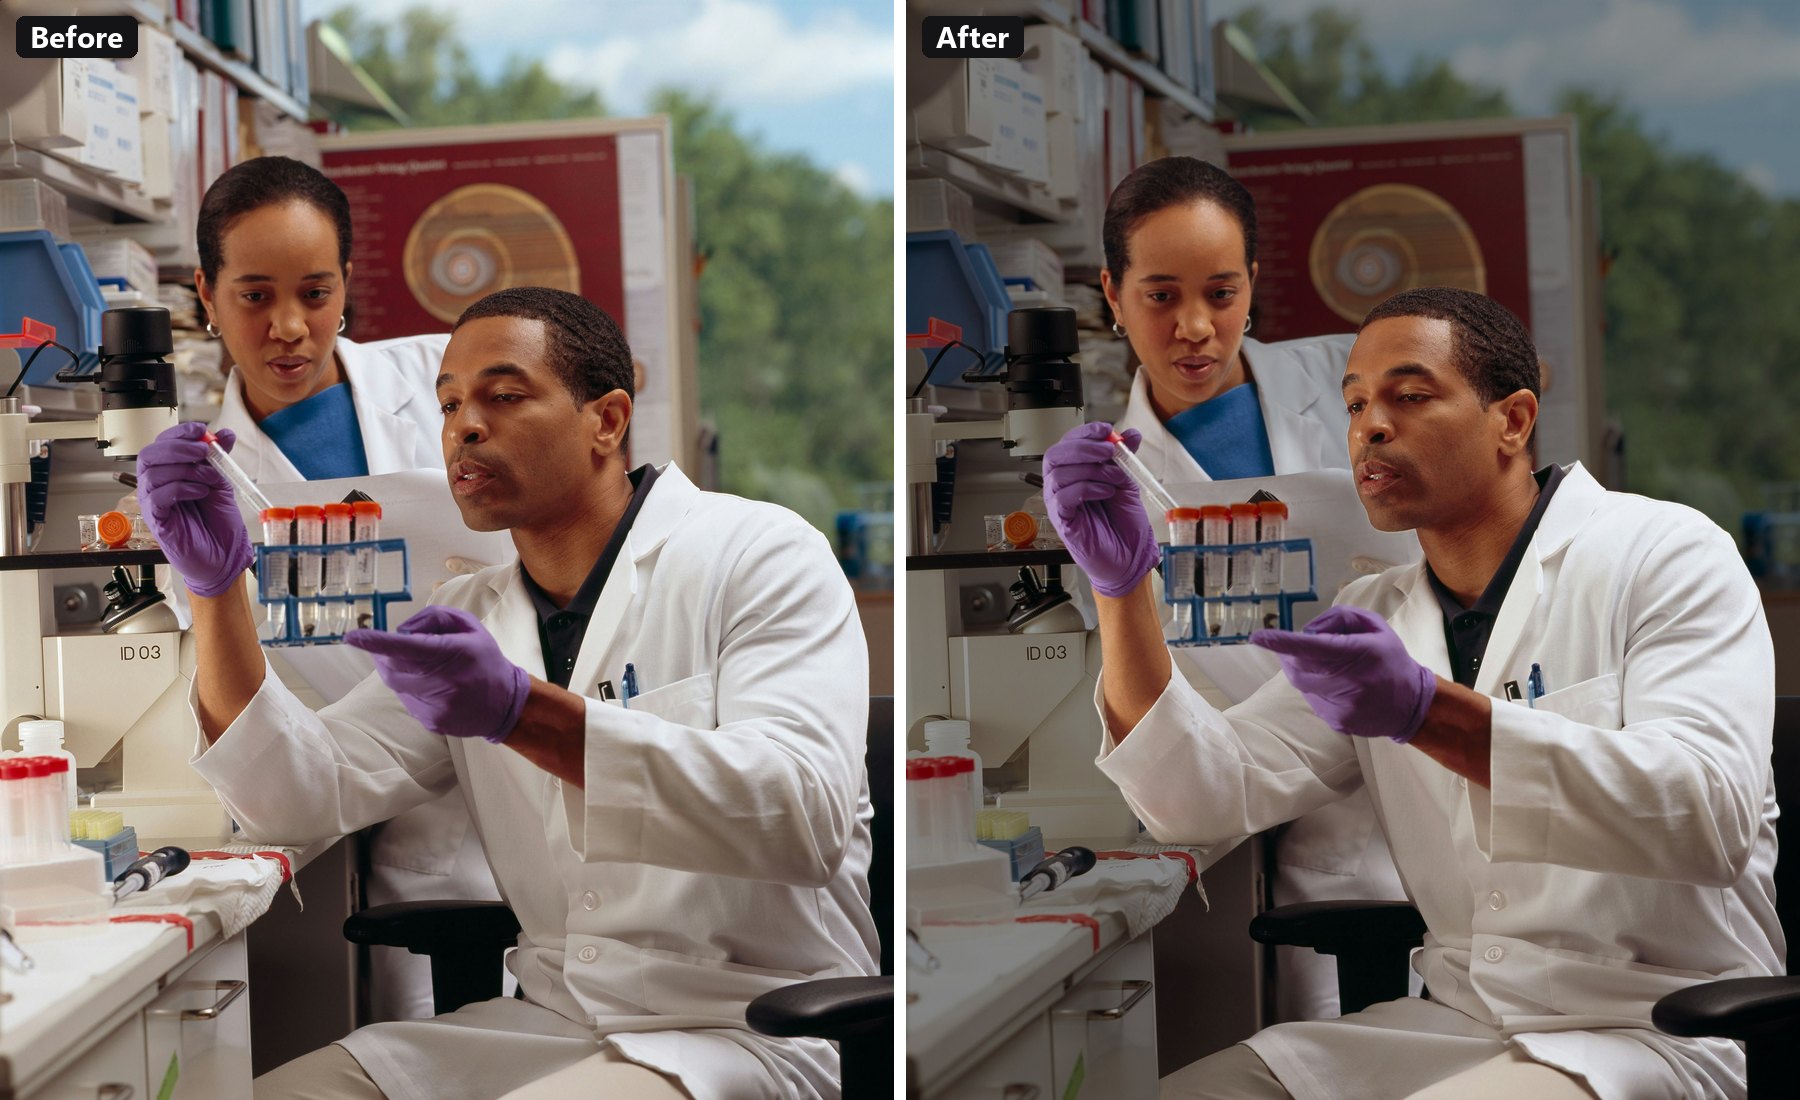
The people do not change. The window and the shelves behind them are now less visible.
The other mask types operate in the same way:
- Subject — the opposite of Background: only the people or the objects in front.
- Linear and Radial — gradients that you put on the photo with handles. For example, use them to make a bright sky darker.
To show the masked area in red, select Tint red. To reverse the mask, select Invert.
Step 6: Blur the background
A shallow depth of field is a different way to make the subject more visible. A portrait lens gives this effect.
- On the Fine-tune tab, open Lens blur.
- Increase Blur amount.
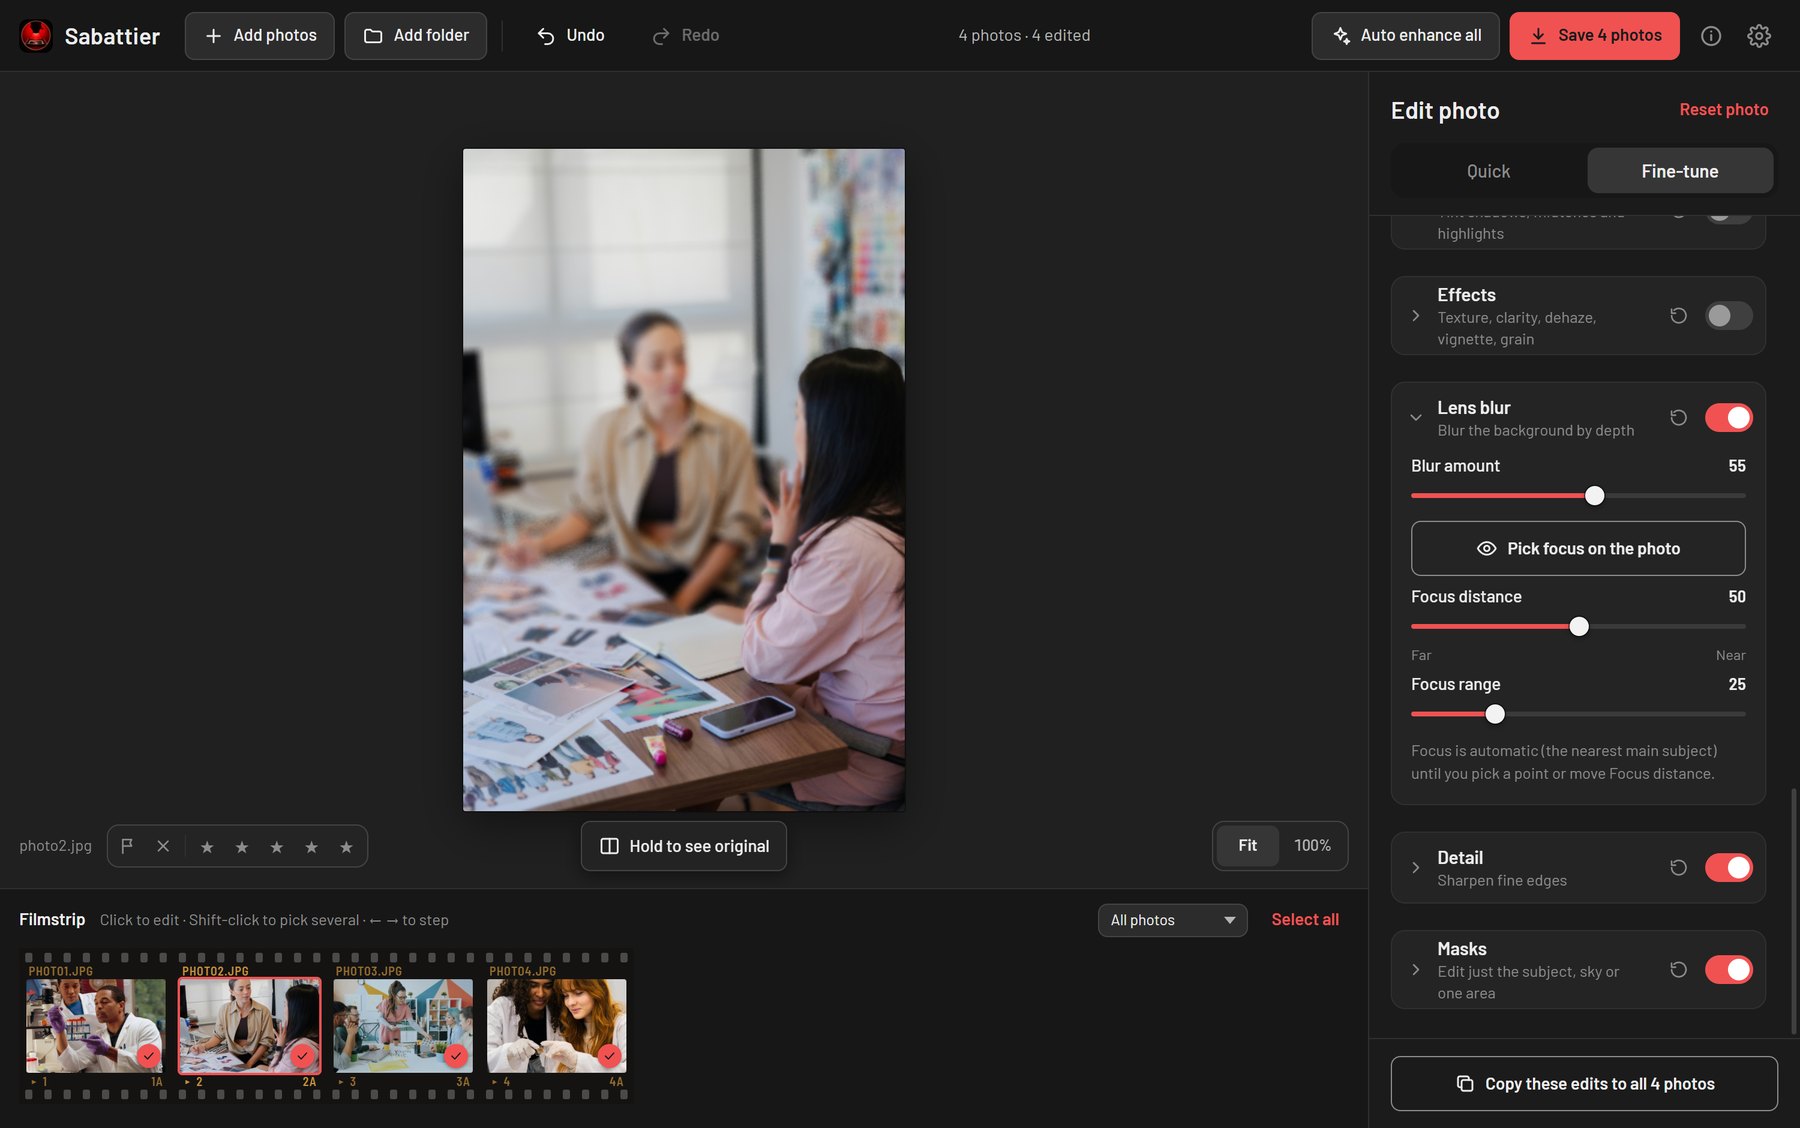
Sabattier calculates the distance from the camera to each part of the photo. Then it blurs each part by its distance. The first time, it downloads a small depth model.
The focus is automatic. It selects the nearest main subject. If the focus is on the incorrect subject, do one of these steps:
- Click Pick focus on the photo, then click the area that must be sharp.
- Move Focus distance between Far and Near.
Focus range sets the depth of the sharp area.
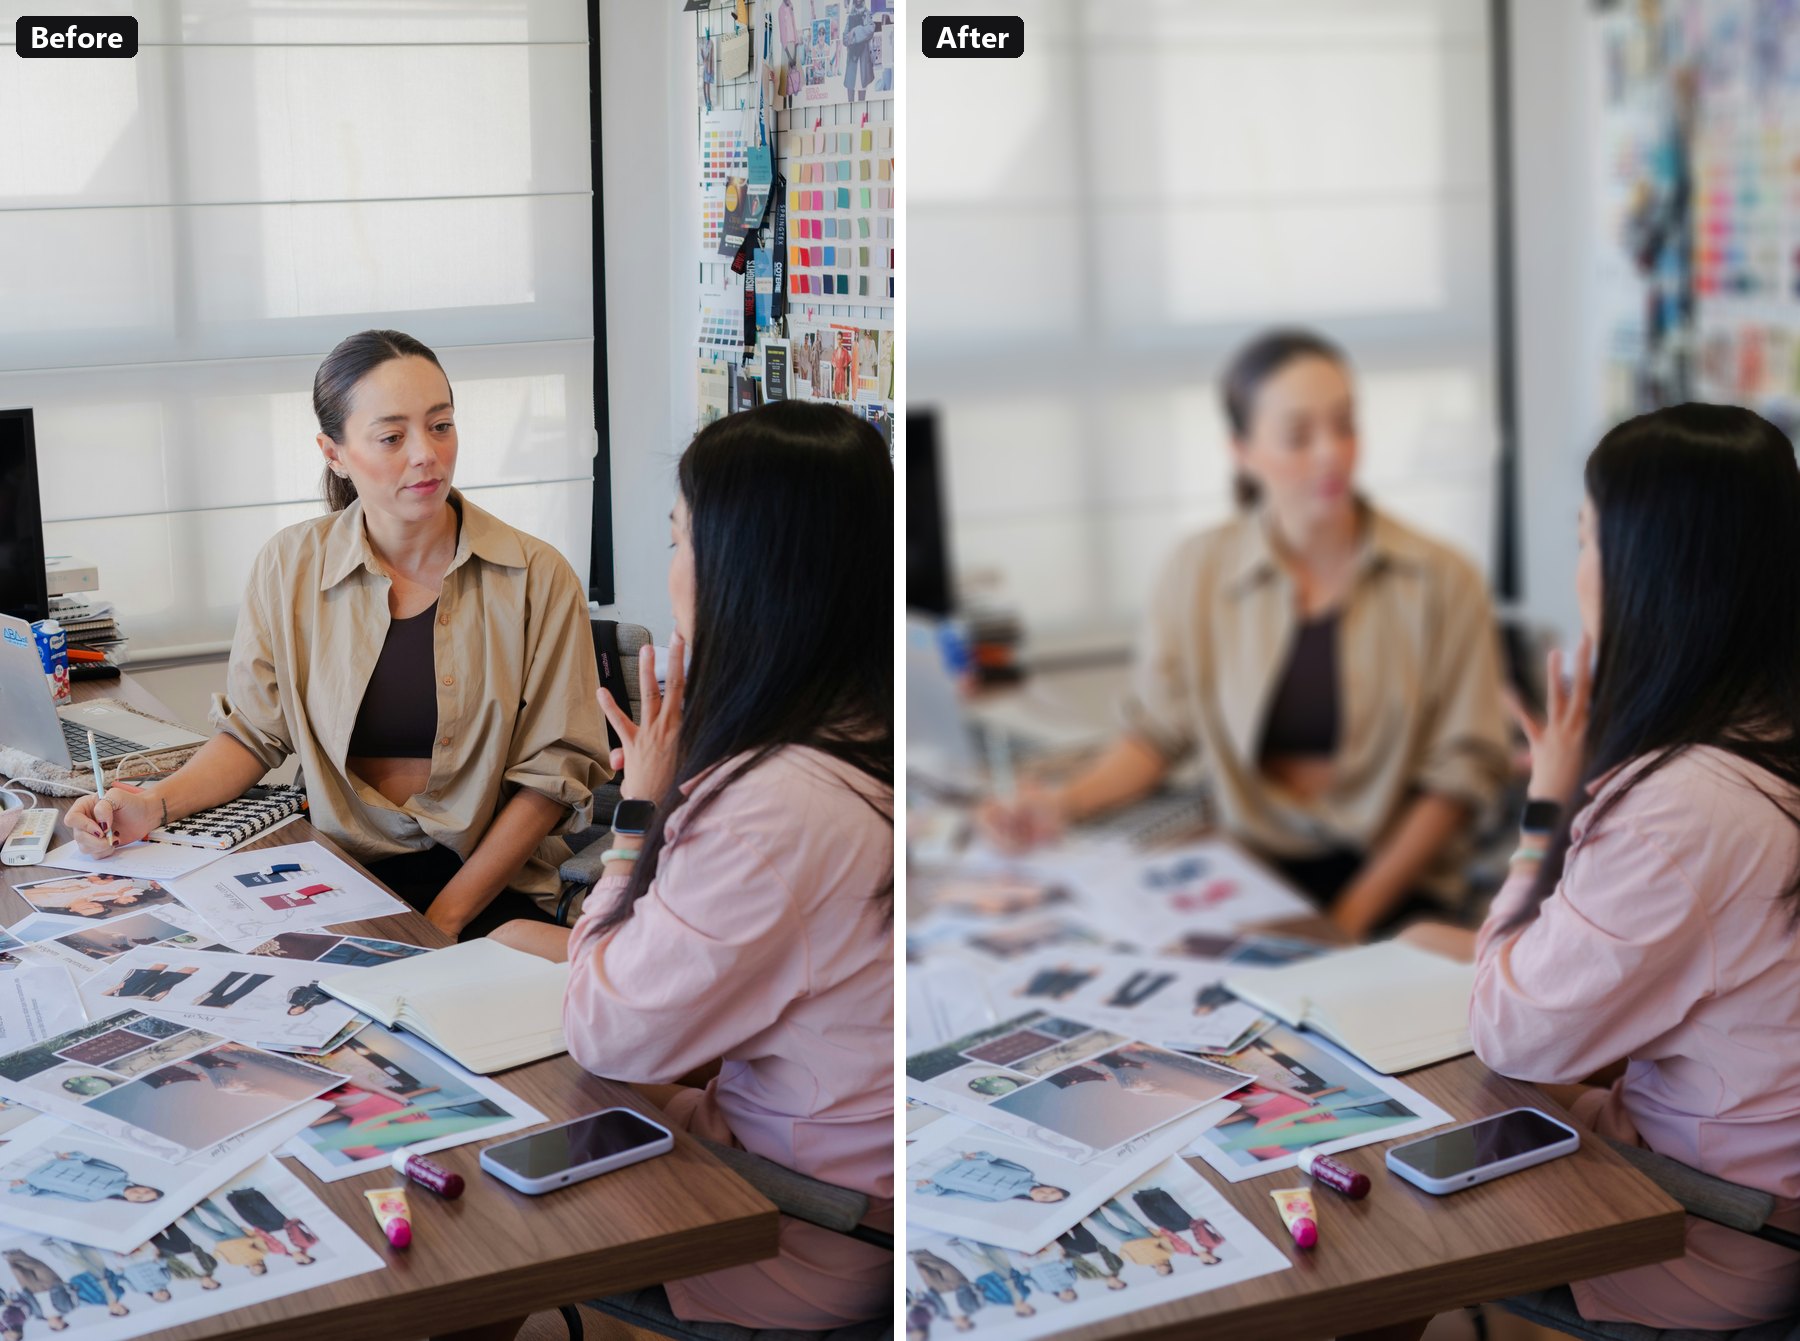
In this example, the blur amount is 55 and the focus range is 25. The person in front stays sharp. The areas behind the person become gradually softer:
Step 7: Edit one face
The People section has masks for Face skin, Eyes, Lips and Teeth. They apply to all faces in the photo. You can also select one face to edit.
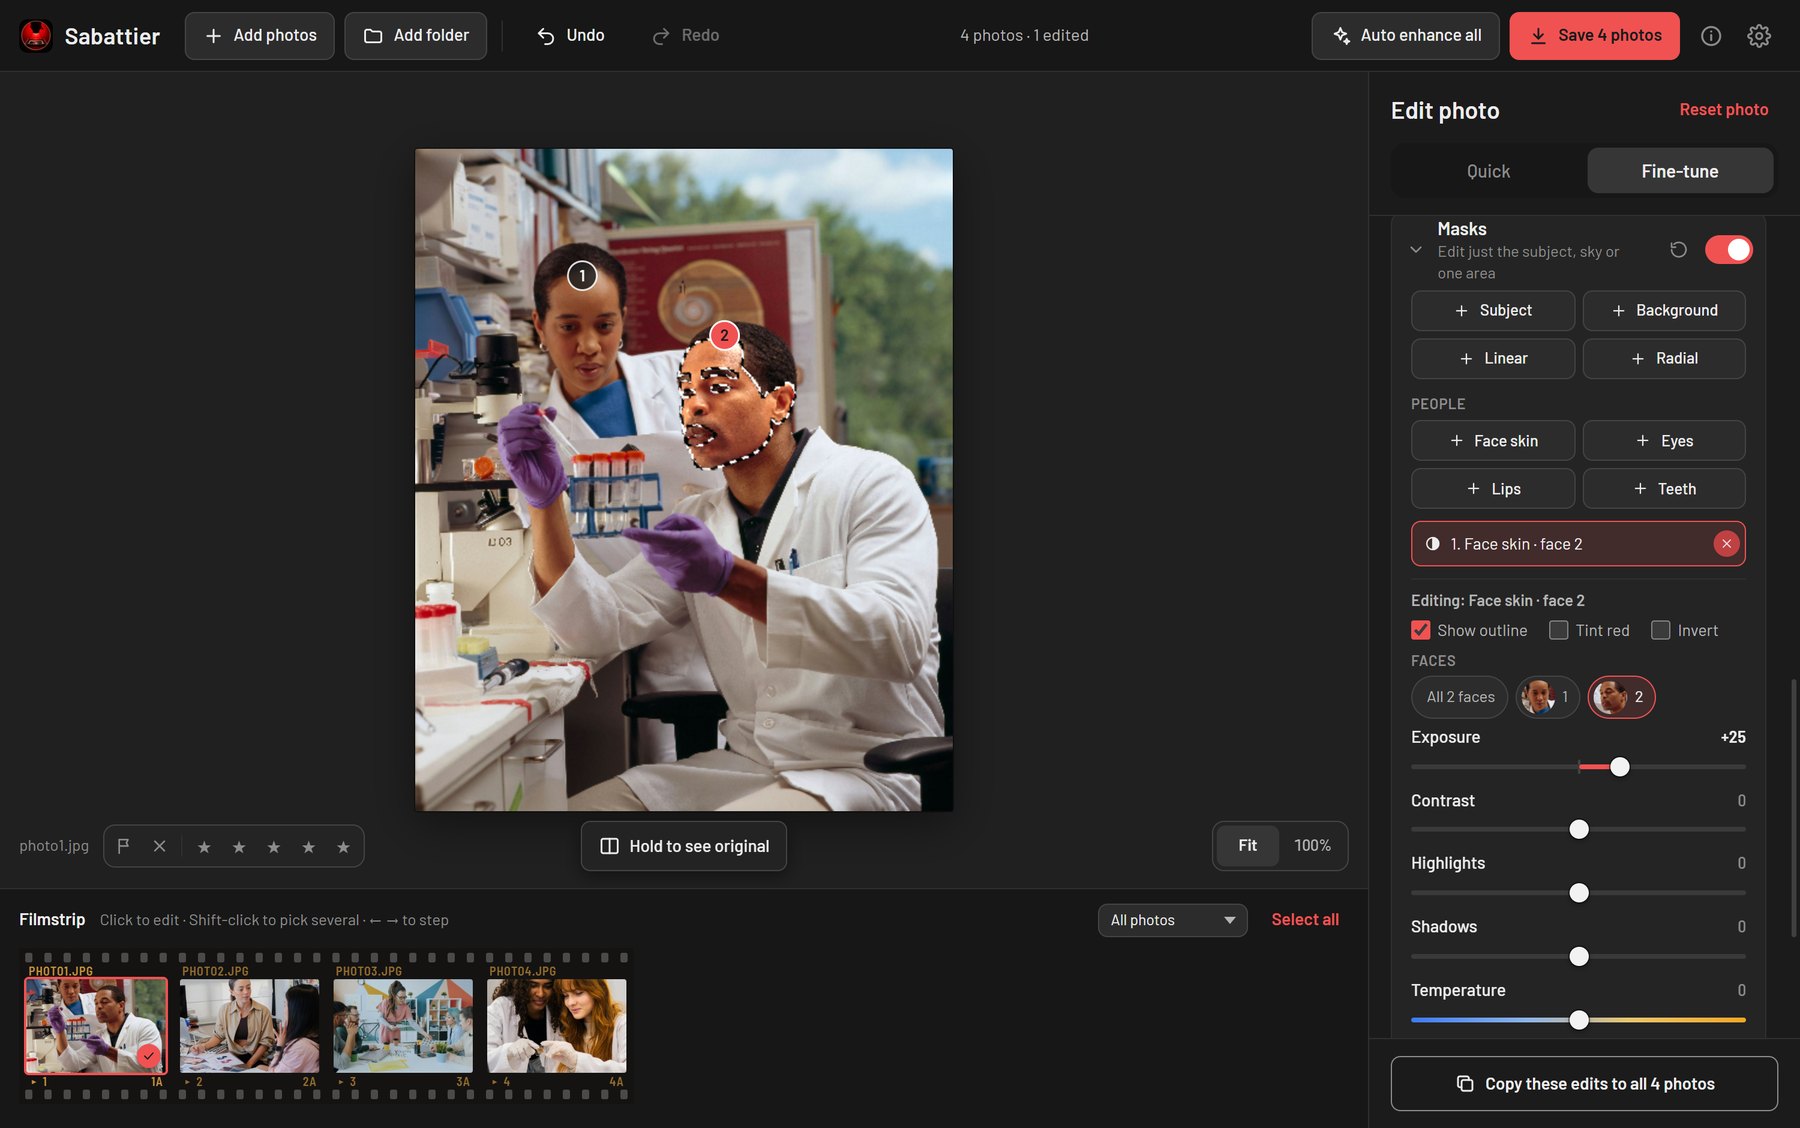
- Click + Face skin. Sabattier finds the faces and shows a number on each face.
- Under Faces, select All 2 faces or one face.
- Move a slider. In the screenshot, face 2 is selected and its Exposure is +25. Only that face becomes brighter.
The skin mask does not include the eyes, brows and lips. Thus, they do not change.
Step 8: Retouch a portrait quickly
To make a portrait better without masks, go back to the Quick tab. Go down to Portrait:
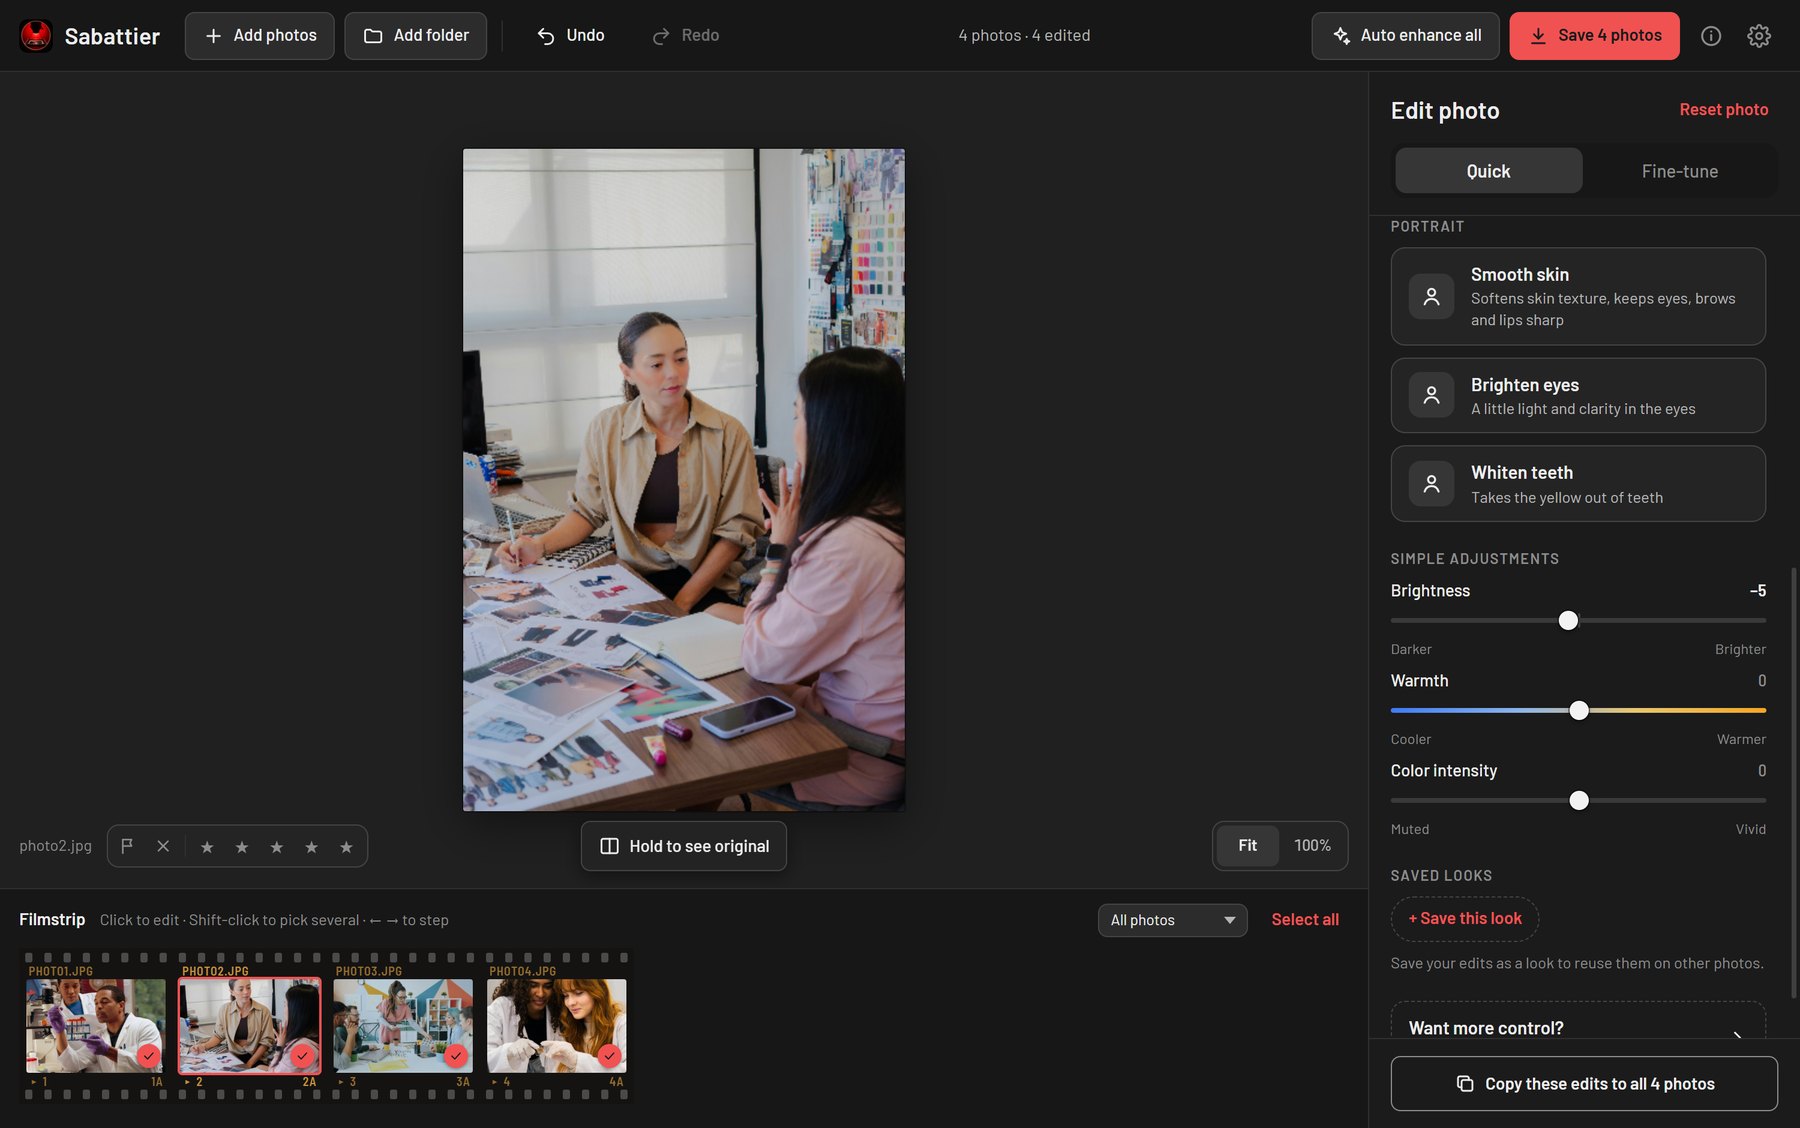
- Smooth skin makes the skin texture softer. The eyes, brows and lips stay sharp.
- Brighten eyes adds a small quantity of light and clarity to the eyes.
- Whiten teeth removes the yellow color from teeth.
Each tool needs one click. Each tool shows in the edit list, thus you can disable it.
Step 9: Apply the same edits to all photos
This function makes Sabattier a batch editor. When one photo is correct, you can use its edits in three ways:
- Copy these edits to all N photos is at the bottom of the panel. It copies the settings of the current photo to all photos. It also copies the masks. Sabattier calculates the subject masks again for each photo.
- Auto enhance all is in the top bar. It examines each photo and corrects it separately. Each photo gets its own values.
- + Save this look is under Saved looks. It saves the edits as a preset. Later, click the preset to apply it to the selected photos.
After a batch operation, Sabattier shows a confirmation with an Undo button. Ctrl+Z also cancels a batch change on all photos at the same time.
Step 10: Rate and pick
Before you save, examine the batch and select the best photos. Select a photo and push a key:
| Key | Action |
|---|---|
0–5 |
Star rating |
P |
Pick |
X |
Reject |
U |
Unflag |
You can also click the flag, the ✕ and the stars below the photo. The ratings show on the filmstrip (see the screenshot in Step 2). Use the All photos dropdown to filter the filmstrip by picks, rejects or rating. Sabattier keeps the ratings between sessions. Thus, you can close the app and continue later.
Step 11: Save
-
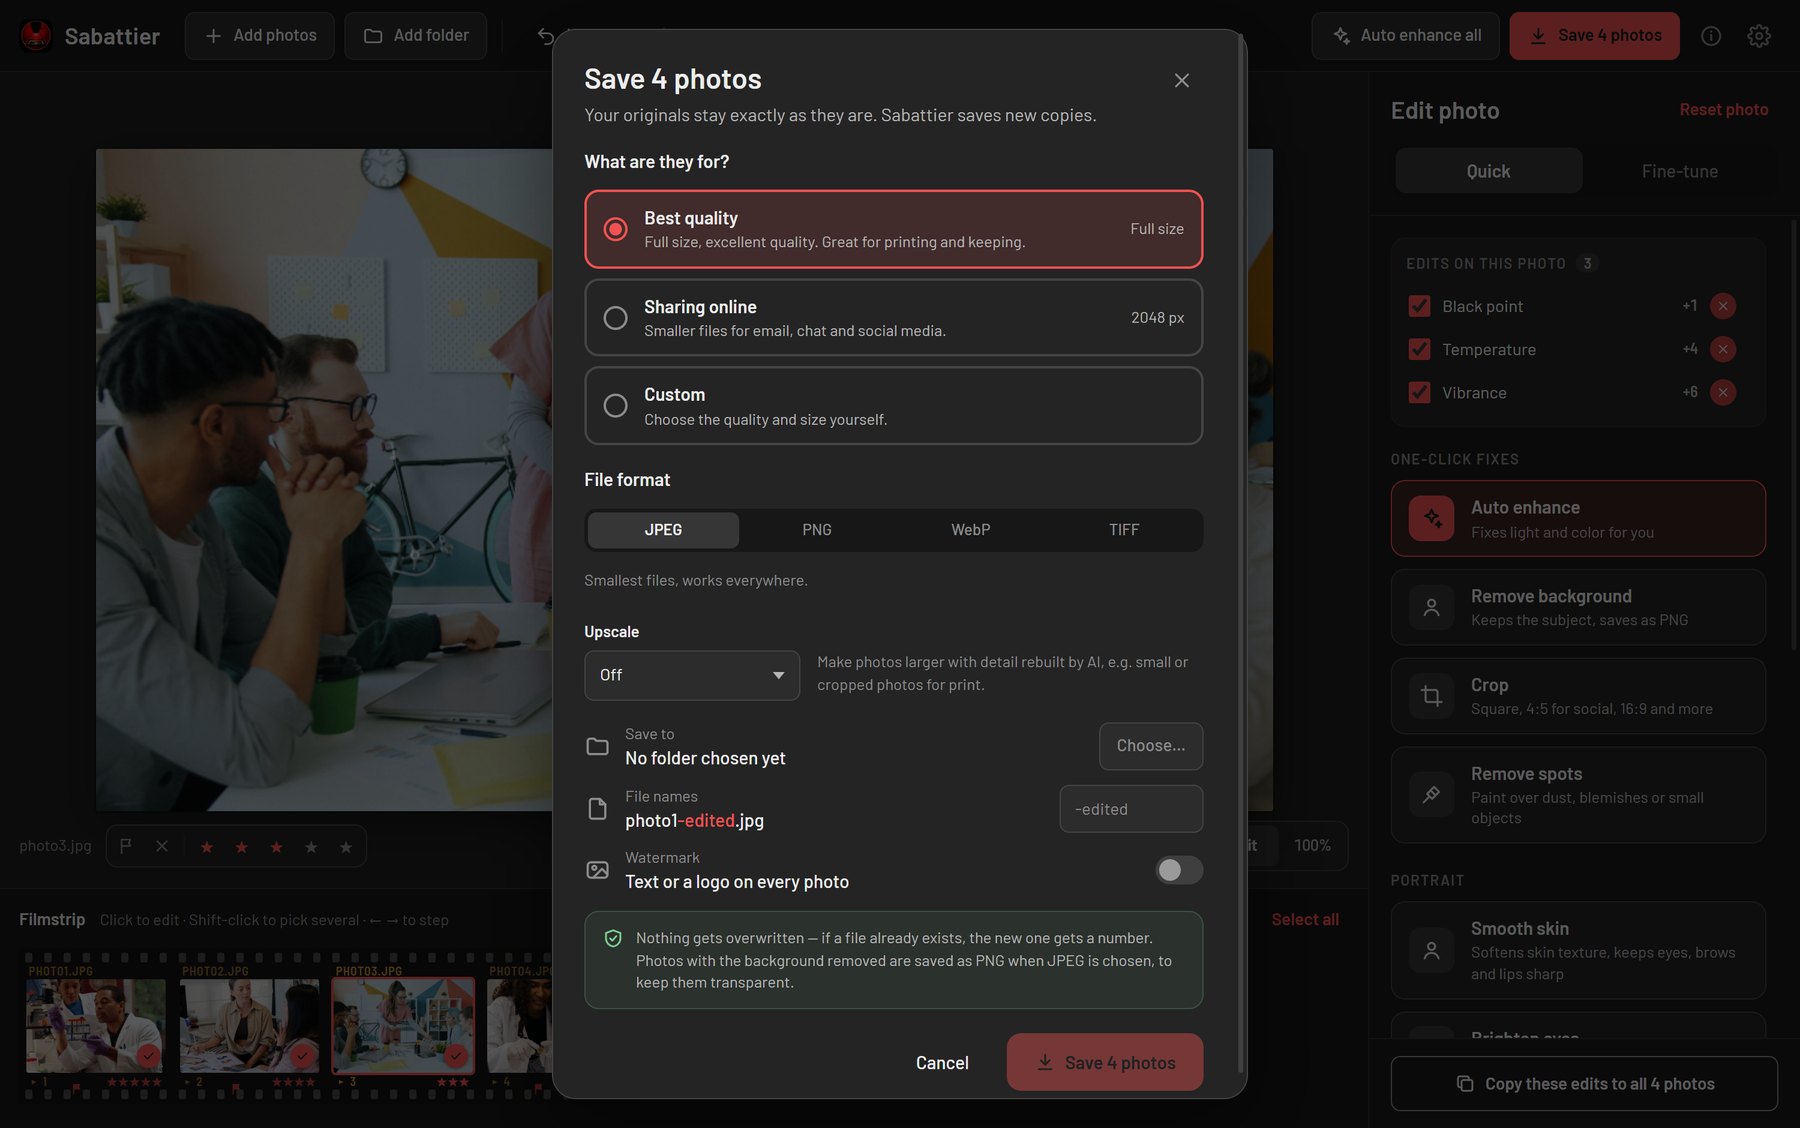
In the top bar, click Save N photos:
-
The dialog asks: What are they for? Select one option:
- Best quality — full size, for printing and storage.
- Sharing online — 2048 px, for email, chat and social media.
- Custom — you select the quality and the size.
-
Select a file format: JPEG, PNG, WebP or TIFF.
- Select a folder.
- Set a filename suffix. The default is
-edited. For example,photo1.jpgbecomesphoto1-edited.jpg.
Sabattier does not change your original photos, and it does not write over files. If a file with the same name exists, Sabattier adds a number to the new file.
The dialog also has two optional functions:
- Upscale makes photos 2× or 4× larger with AI (Real-ESRGAN). Use it for small photos or photos with a large crop that you want to print.
- Watermark adds text or a logo to each photo. You can put it in a corner or in the center, and set its size and opacity.
The other tools
The steps above show the tools that I use on almost all batches. The Fine-tune tab has more tools for photos that need them:
- Light and color — exposure, highlights, shadows, whites, black point, temperature, tint, hue, saturation, vibrance and 3-way color wheels. The GPU shows the changes immediately, with a live histogram. You can also drag on the histogram to make one tonal zone brighter or darker.
- Tone curve and color mixer — RGB curves, and hue, saturation and luminance for eight color bands.
- Effects — texture, clarity, dehaze, vignette, film grain and sharpening.
- Remove spots — paint on dust, blemishes or small objects. An inpainting model (LaMa) fills these areas.
- HDR merge — select bracketed photos and merge them into one photo.
The gear icon in the top bar opens Settings. Settings has these items:
- Theme: Dark, Light or System.
- The downloaded AI models, with their sizes and licenses.
- Backup & restore for your settings, presets and ratings.
Your photos stay on your computer
All AI models run on your computer with ONNX Runtime. Sabattier downloads each model one time, when you first use the tool that needs it. It compares each download with a pinned SHA-256 hash. After that, Sabattier operates offline, and your photos stay on your computer.
Links
- Repo: github.com/sina5/sabattier
- Download: latest release
Sabattier operates on Windows 10/11 and on macOS with Apple Silicon. The sample photos in the screenshots are from Unsplash. The credits are in images/README.md in the repo. Issues and PRs are welcome.
Sabattier is free and open source. If it helps you, you can support its development on 💖 GitHub Sponsors.
Lead AI Engineer. I write about reinforcement learning, transformers, multi-agent systems, and the tools I build along the way.