Skip to content

Programming

Redthread: Portable, Git-Backed Memory for AI Coding Agents

Every coding agent I use keeps its memory in a local folder — .claude/, .cursor/, .agent/. That works until you switch machines, and then the agent has amnesia. The context it built up about your project stays on the laptop where it happened.

Redthread is a small tool I wrote to fix that. It stores agent memory in a git repo instead of a local folder, and exposes it over MCP, so every machine that clones the store sees the same memory. This post is a quick walkthrough: install it, wire it to your agent, and use it.

Install

pip install redthread          # or: uv tool install redthread

Everything below needs redthread 0.6 or newer — that release reworked the agent-facing surface substantially, and a few of the tool signatures changed with it.

Create a store

A store is a git repo with a declared phase pipeline — an ordered list of whatever names fit your project. build,test,present and train,eval,present are equally valid:

redthread init my-project --phases build,test,present --store ./my-store

Connect your agent

For Claude Code, one command:

claude mcp add redthread -- uvx redthread mcp-serve --store ./my-store

uvx fetches Redthread from PyPI on first launch, so this works even without the install step above. Already installed it? Drop uvx:

claude mcp add redthread -- redthread mcp-serve --store ./my-store

Verify with /mcp inside Claude Code — redthread should show up as connected with 17 tools. A quick smoke test is asking the agent to call context_bootstrap. Note that MCP servers are only read at session start, so if you added it mid-session you'll need to restart Claude Code before the tools appear.

Cursor uses an install deeplink rather than a CLI command, and VS Code has code --add-mcp; the per-client reference covers Cursor, VS Code, Windsurf, Claude Desktop, Codex CLI, Gemini CLI, and the Claude Agent SDK.

Make the agent actually use it

This is the part that's easy to miss, and the part I've spent the most time on. Registering the MCP server gives the agent the capability to use memory — nothing tells it to actually reach for those tools. It'll happily ignore them for an entire session.

There are two halves to fixing that.

One: give it a front door. A cold agent that wants to use memory still has to figure out which runs exist, which memory namespaces exist, and what's in them — several calls deep before it learns anything useful, and it usually gives up first. So there's a single tool that answers all of it at once:

redthread bootstrap --store ./my-store

That prints the same payload the agent gets from context_bootstrap: the phase pipeline, recent runs and their status, published handoffs, and an index of every memory entry with a one-line description each. It also returns a _next field telling the agent what to do with what it just got — read these entries, or start a run, or write a session summary before finishing. One call, and the agent knows where it is.

Two: give it the habit. A note in AGENTS.md (or CLAUDE.md) is the first thing most agents read. Redthread will write it for you — ask the agent to call agents_md_bootstrap and it appends a short usage policy to your project's existing file. Idempotent, so it's safe to call every session.

One caveat worth knowing if you use subagents: they don't inherit the main agent's instructions, and they don't read AGENTS.md. A subagent doing real work will silently skip memory entirely. That's why the guidance lives in the tool descriptions and responses too, not just in a config file — it's the only channel that reaches every agent in every client. If you delegate something worth remembering, tell the subagent to call context_bootstrap as well.

Make it portable

So far this is a local git repo. Give it a remote and sync:

git -C ./my-store remote add origin git@github.com:you/my-store.git
redthread sync --store ./my-store

sync is a one-shot commit + pull --rebase + push. Any other machine that clones the store now sees the same memory — which is the whole point. There's also an auto-commit daemon (redthread daemon run) if you'd rather not think about it.

Don't want to provision a second repo? Redthread can put the store on an orphan branch of a repo you already have, as a git worktree, without ever touching that repo's checked-out branch:

redthread init my-project --phases build,test,present \
  --store ./my-store --worktree-repo .

This writes a small .redthread.yaml marker into the host repo. Commit it, and the next machine just clones your code repo and registers the same MCP command — no flags to remember, no manual clone of the store.

The CLI, in 60 seconds

The same store also tracks multi-phase runs, which is useful outside the agent case — pipelines where one phase's conclusions feed the next. One end-to-end pass:

# a run is one attempt through your declared phases
run_id=$(redthread run start --store ./my-store)

# append immutable context entries as a phase works
redthread log "$run_id" build note '{"msg": "kicked off build"}' --store ./my-store

# publish the build phase's curated handoff for the next phase
echo '{"headline": "build ok", "key_results": {"warnings": 0}}' > handoff.json
redthread handoff publish "$run_id" build handoff.json --store ./my-store

# the test phase reads only the handoff — never build's raw log
redthread handoff get "$run_id" build --store ./my-store

# full raw history, one JSON entry per line
redthread read "$run_id" --store ./my-store

The handoff/raw-log split is deliberate. Entries are append-only and immutable, so the raw log grows without bound — but a downstream phase reads the short curated handoff, not the transcript. That's what keeps context windows from filling with a previous phase's noise.

One quality-of-life note: run_id is optional on every run-scoped tool on the MCP side. Omit it and it resolves to the store's newest active run, with the id it picked echoed back in the response — so an agent can't quietly write to the wrong run. Pass it explicitly when several runs are in flight across machines.

Memory that describes itself

Long-term memory is separate from runs, because most of what's worth remembering isn't tied to one attempt. Each entry carries a one-line description, stored as YAML frontmatter:

redthread memory write notes toolchain.md ./note.md \
  --description "Why this project uses uv, not conda" \
  --tags toolchain --store ./my-store

redthread memory list --store ./my-store

That description does more work than it looks like. Listing memory returns descriptions rather than bare filenames, so an agent can tell what's worth opening without reading every entry first — which is the difference between memory that gets used and memory that quietly rots. Entries written without one fall back to their first meaningful line, so old stores still list sensibly.

When you're after something specific, search covers keys, descriptions, tags, and bodies, and reports the line that matched:

redthread memory search uv --store ./my-store

The same reads are also exposed as MCP resourcesredthread://bootstrap, redthread://memory, redthread://handoff/{run_id}/{phase}, and a few more — for clients that can attach context directly instead of spending a tool call on it.

One warning

The store is a git repo, usually pushed to a shared remote. Never write secrets to it. Anything an agent puts in memory is committed to history and visible to everyone with access.

It's MIT-licensed and works on Windows, Linux, and macOS (Python 3.11+). Issues and PRs welcome.

Install Python 3.7 on CentOS with All Dependencies

Install Build Dependencies

In this post, I will go through installing Python 3.7 and all its dependencies on CentOS. Unlike Ubuntu, Python is not readily accessible using yum package manager on CentOS. Therefore, we first need to install a few packages before installing Python.

$ sudo yum groupinstall -y "Development Tools"

$ sudo yum install -y gcc zlib-devel bzip2 bzip2-devel readline-devel sqlite sqlite-devel openssl-devel tk-devel libffi-devel xz-devel gdbm-devel ncurses-devel db4-devel wget

Download and Build Python

Now that we installed all the dependencies, we need to download the latest Python from its website, https://www.python.org/downloads/:

$ wget https://www.python.org/ftp/python/3.7.4/Python-3.7.4.tgz

Then, we need to extract the files from the archive and configure the installation:

$ tar -xzvf Python-3.7.4.tgz

$ sudo sh Python-3.7.4/configure --enable-optimizations

Finally, we run the following command to install Python:

$ sudo make altinstall

Your Python is now installed in the following folder: /usr/local/bin/

Optionally, you can make a link to access your Python using python3 command:

$ sudo ln -s /usr/local/bin/python3.7 /usr/bin/python3

$ sudo ln -s /usr/local/bin/pip3.7 /usr/bin/pip3

Note, if you cannot access Python by typing python3, you may need to add the following line to your .bashrc file:

export PATH=$PATH:/usr/local/bin/

Note: Your .bashrc is located in your home folder.

Now, disconnect and then connect back to your machine.

Please let me know if you had any questions or concerns in the comment section.

How to Install LAPACK on Mac OS

Using Apple's Accelerate Framework

This is a question I get asked a lot. LAPACK is actually included in the Accelerate library provided by Apple. You can include it in the header file of your C++ source code. Refer to this post for more information on how to use LAPACK included in Accelerate.

Installing the Latest LAPACK via Homebrew

If you like to use the latest version of LAPACK, you can easily install it using Homebrew. Enter the following command in a terminal window to install Homebrew:

/usr/bin/ruby -e "$(curl -fsSL https://raw.githubusercontent.com/Homebrew/install/master/install)"

Installing GCC and GFortran

To install LAPACK libraries, you should first install GFortran which is included as a part of GCC. Run the following command in a terminal window:

brew install gcc

Installing LAPACK

Now, you can simply install LAPACK by typing the following command in a terminal window:

brew install lapack

Please let me know your questions in the comment section.

MS SQL on macOS: Connect to Your Database Using Python

In this article series, I'll review the tools and options to connect to an MS SQL server on macOS.

Table of contents:

Microsoft has released a beta version of its ODBC driver for macOS. Here is a quick and easy guide to connecting to your MS SQL using python.

Install Homebrew

The first thing you need is to install Homebrew.

Enter the following command in a terminal window to install Homebrew:

/usr/bin/ruby -e "$(curl -fsSL https://raw.githubusercontent.com/Homebrew/install/master/install)"

Install the ODBC Driver

Afterward, enter the following commands in a terminal window to install Microsoft ODBC driver 13 for macOS:

brew tap microsoft/msodbcsql https://github.com/Microsoft/homebrew-msodbcsql-preview
brew update
brew install msodbcsql

Install pyodbc

Next item you need to install is pyodbc by entering the following command in a terminal:

pip install pyodbc

Now you have all the prerequisites to connect to your MS SQL database in python.

Configure ODBC

Now navigate to unixodbc folder using the following command:

cd /usr/local/Cellar/unixodbc/2.3.4

Here you have two files:

  1. odbc.ini
  2. odbcinst.ini

Open odbc.ini using the following command:

nano odbcinst.ini

There you will see the following information:

[ODBC Driver 13 for SQL Server]
Description=Microsoft ODBC Driver 13 for SQL Server
Driver=/usr/local/lib/libmsodbcsql.13.dylib
UsageCount=1

You need the copy the content in the square brackets which in my case is "ODBC Driver 13 for SQL Server".

Exit the editor and open a new file like this:

nano ~/tempfile

Add the following lines to this file:

[MSSQL]
Description = Test to SQLServer
Driver = ODBC Driver 13 for SQL Server
Trace = No
Server = YourSQLServerAddress

Replace ODBC Driver 13 for SQL Server with the content you copied in the square brackets. Also, write your SQL server address instead of YourSQLServerAddress. Save the file and exit Nano editor.

Now, enter the following command in the terminal and enter your password:

sudo odbcinst -i -s -f ~/tempfile -l

Test the Connection

To test your connection, open python editor and run the following script:

DSN is the name you used in the temp file. Replace yourUserName and yourPassWord with the ones you use for your SQL server.

You will see an output similar to:

<pyodbc.Connection object at 0xfffffffff>

MS SQL on macOS: Use Oracle SQL Manager to Access Your Database

In this article series, I'll review the tools and options to connect to an MS SQL server on macOS.

Table of contents:

Prerequisites

In order to connect to Azure SQL Database from MacOS (OS X) for free, you need two things:

  1. Oracle SQL Developer (Download)
  2. JTDS driver (Download)

Download these files and install Oracle SQL Developer. Then extract the JTDS driver zip file in a desired location (e.g., \Users\"Your User Name"\JTDS\).

Configuring the JDBC Driver

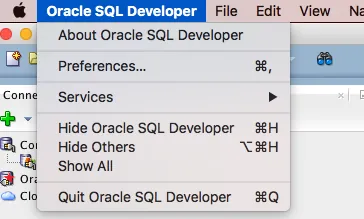
Now open your Oracle SQL Developer and from the menu open preference as following figure shows:

SQL Developer

From the Preference window, open Database > Third Party JDBC Drivers:

Click on the photo to open the full size image!

SQL Developer

Here click on Add Entry and find your JTDS folder and choose jtds-1.3.1.jar as the driver path and click on Select and then OK.

Note: Before moving on from this part, make sure you have added your IP address in the firewall setting of your Azure Portal's desired database.

Adding Your Database

Now you are ready to add your database to the program. From the connection pane on the left, click on the "+" button.

SQL Developer

Now click on "SQLServer" tab and add your database connection information:

SQL Developer

Click on connect. Don't forget to retrieve your database here. Now save this profile. Now your database is ready to be inquired by transact SQL.

Next article: MS SQL on macOS: Connect to your database using Python