Skip to content

2018

What Is My Gateway Address?

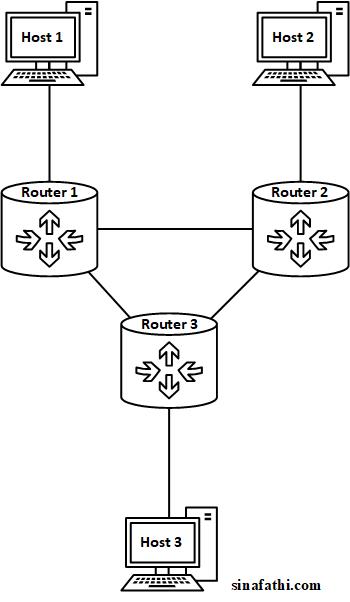
Choosing a gateway address on Linux machines is an easy task to perform. Let's consider a network consisting of three Linux machines as Figure 1 shows.

Let's consider the following subnet and IP addresses:

Figure 1. Network configuration.

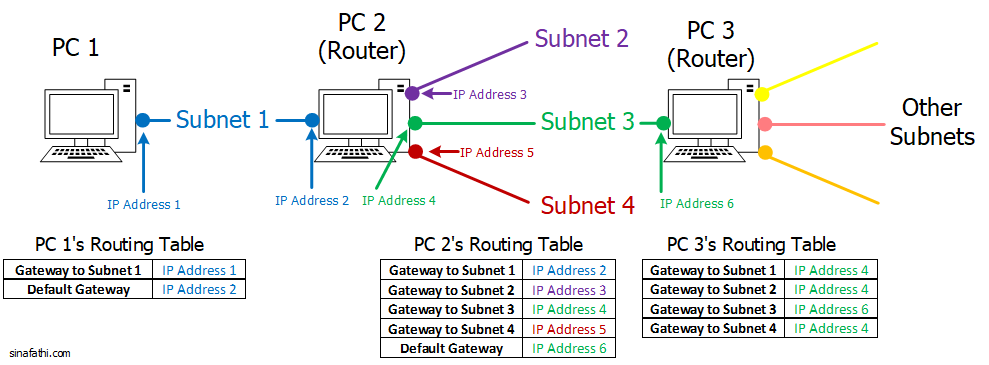
  • Subnet 1: 10.0.0.0/24, IP Address 1: 10.0.0.1, and IP address 2: 10.0.0.2.
  • Subnet 2: 11.0.0.0/24 and IP Address 3: 11.0.0.1.
  • Subnet 3: 12.0.0.0/24, IP Address 4: 12.0.0.1, and IP address 6: 12.0.0.2.
  • Subnet 4: 13.0.0.0/24 and IP Address 4: 13.0.0.1.

Run route -n command to check the current routes on each PC. Then use ip route flush table main command to clear the routing tables. Also, we need to enable IP forwarding on the routers.

Since PC 1 is only connected to subnet 1, we first add a route to subnet 1 using following command:

$ route add -net 10.0.0.0 netmask 255.255.255.0 gw 10.0.0.1

To connect PC 1 to other subnets on the network, we either need to add other subnets addresses to the routing table one by one or add a default gateway to send all the packets not intended for Subnet 1 to that gateway.

$ route add default gw 10.0.0.2

Similar to PC 1, we can add the routes to other PCs on the network based on the tables in Figure 1.

On PC 2:

$ route add -net 10.0.0.0 netmask 255.255.255.0 gw 10.0.0.2
$ route add -net 11.0.0.0 netmask 255.255.255.0 gw 11.0.0.1
$ route add -net 12.0.0.0 netmask 255.255.255.0 gw 12.0.0.1
$ route add -net 13.0.0.0 netmask 255.255.255.0 gw 13.0.0.1

And the default gateway is for all the packets to other networks which are not directly connected to PC 2:

$ route add default gw 12.0.0.2

PC 3 is directly connected to Subnet 3, but it is not directly connected to Subnets 1, 2, and 4. To add the routes, we use the following commands:

$ route add -net 12.0.0.0 netmask 255.255.255.0 gw 12.0.0.2
$ route add -net 10.0.0.0 netmask 255.255.255.0 gw 12.0.0.1
$ route add -net 11.0.0.0 netmask 255.255.255.0 gw 12.0.0.1
$ route add -net 13.0.0.0 netmask 255.255.255.0 gw 12.0.0.1

Asymmetric Static Routing Network Using Ubuntu Machines

In asymmetric routing, data packets take different paths to go from source to destination and to come back [source]. To set up an asymmetric network on Linux machines running Ubuntu 16.04, first, we need to configure the systems to act as routers. Let's consider a network of 3 hosts and 3 routers as Figure 1 shows. The routers are going to be Linux systems bundled with several NICs.

Figure 1. Network layout.

Figure 1. Network layout.

The routers should be able to forward the packets from one network interface card's (NIC) port to the others. In a terminal window, enter the following command under root privileges (only on routers):

sysctl net.ipv4.ip_forward=1

We also need to ensure that packets coming from a different path than they were sent to, are not dropped as well. Enter the following command (only on routers):

sysctl net.ipv4.conf.all.rp_filter=2

Now, we are ready to assign static routes to the machines. We consider the following subnets here:

  • The subnet for Host 1 connection to Router 1: 10.0.1.0/24
  • The subnet for Host 2 connection to Router 2: 10.0.2.0/24
  • The subnet for Host 3 connection to Router 3: 10.0.3.0/24
  • The subnet for Router 1 connection to Router 2: 10.0.4.0/24
  • The subnet for Router 1 connection to Router 3: 10.0.5.0/24
  • The subnet for Router 2 connection to Router 3: 10.0.6.0/24

Figure 2 shows the assigned IP address to each port of Linux machines.

Figure 2. Assigned IP addresses to each port.

Figure 2. Assigned IP addresses to each port.

The only remaining step is to set up routing tables on each system. To assign routes to each machine we use the route command in terminal.

Hosts use their own assigned IP address for the gateway to their subnets and the IP address of next hop on the same subnet for the gateway to other networks. For example, Host 1 uses the gateway 10.0.1.2 for network 10.0.1.0 and the gateway 10.0.1.1 to connect to network 10.0.5.0. We run the following commands for these two networks on Host 1:

route add -net 10.0.1.0 netmask 255.255.255.0 gw 10.0.1.2
route add -net 10.0.5.0 netmask 255.255.255.0 gw 10.0.1.1

We need to run the same command to add all the 6 subnets to every host and router on the network. Figure 3 shows the required routing tables for each machine.

Figure 3. Routing tables for each system.

Figure 3. Routing tables for each system.

Now we can also add alternate routes to the same network with a higher metric (lower priority) using the route command. For example, we could add the following backup route to Router 2:

route add -net 10.0.3.0 netmask 255.255.255.0 gw 10.0.4.1 metric 100

We can test this route by running the ping command on a specific interface of router 2:

ping 10.0.3.2 -I interface_connected_from_Router_2_to_Router_1

Let me know if you had any questions in the comment section.